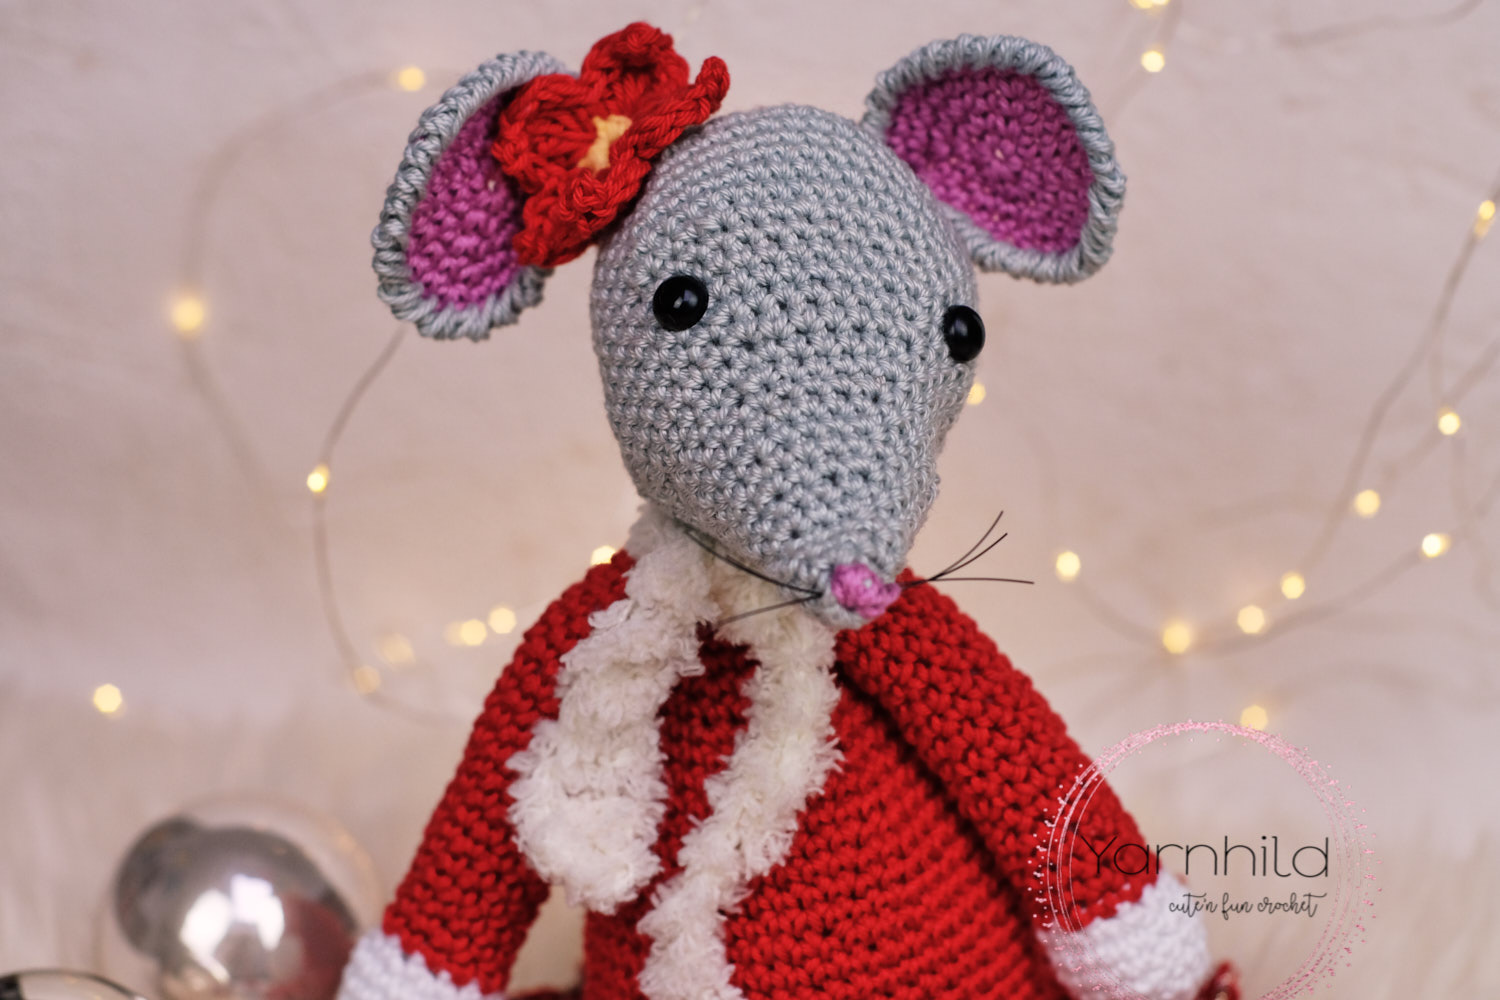
Crochet Christmas mouse Lily
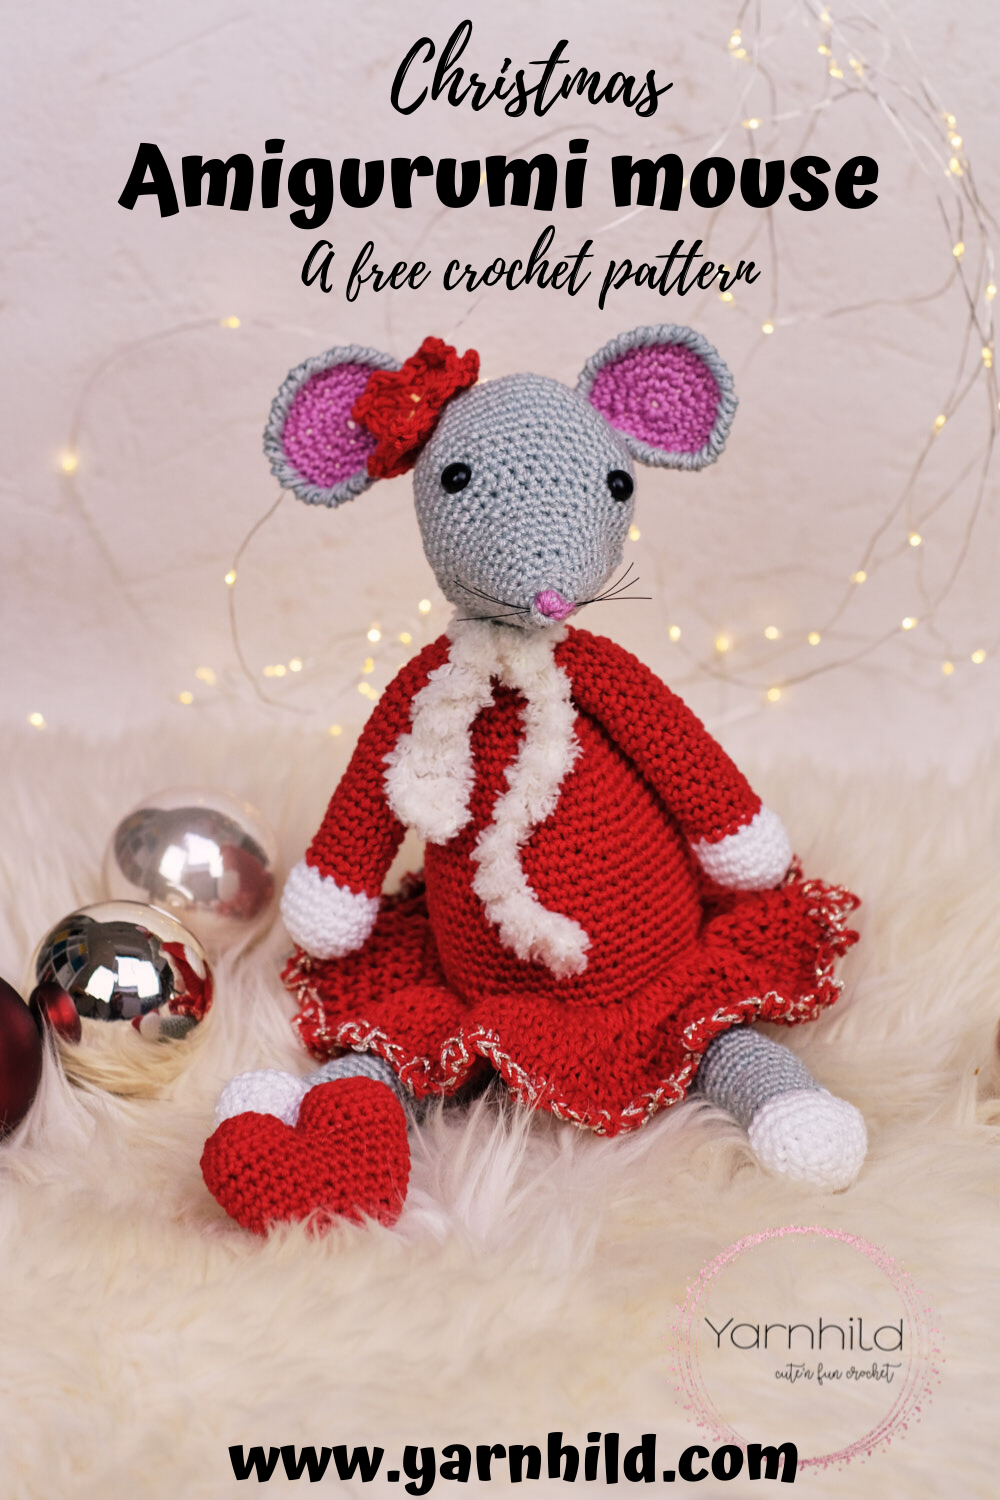
This blog post may contain affiliate links. Hi friends! Today I have a special pattern for you! A giant version of my popular crochet mouse pattern, Lisa the mouse! Meet the crochet, Christmas Lily! This lady is about 37 cm/ 14.5 inches and has a beautiful dress that you can put your unique touch on.
Hier zur der deutsche Anleitung
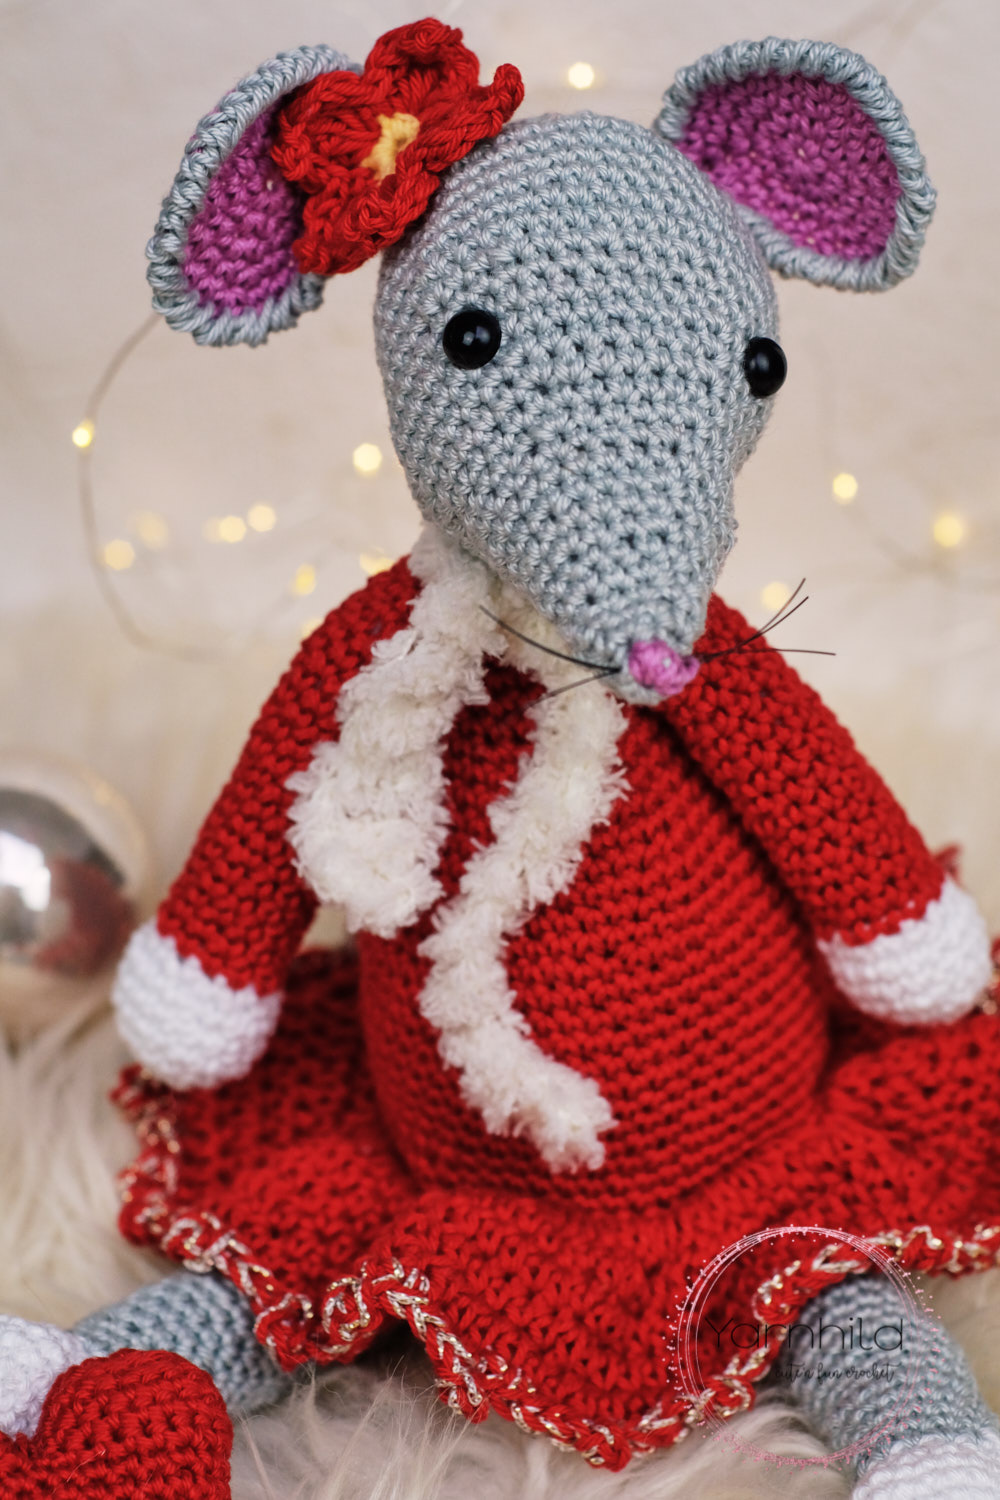
All the parts for the Christmas crochet mouse are made separately and because she's so big, I had to make sure that the head was stable enough. So I made the neck a little thicker, added a pipe cleaner and made a scarf for extra support. I also would recommend you to sew the head pretty tight on, so it doesn't move much at all.
The yarn
This adorable mouse is made with yarn from the German yarn brand called Schahenmayr Catania! I really do recommend this yarn, because it is so easy to work with! The yarn has a nice shimmer to it that will make your work look extra pretty! Also, it doesn't split up when you work with it and that is a huge advantage when working with amigurumis.
I would love to see your version of the crochet Christmas mouse Lily! You can add a striped dress or buttons and stuff to put your own spin on her!
Malvin the mouse
If you have been following my blog, you know that Lisa and Malvin was a mouse couple I've made in 2017. I have also been thinking of doing a giant Malvin version also, but I haven't had the time this Christmas! But for those of you who feel extra adventurous, I have a little challenge for you! You can make Lily a big male version just by following this pattern. You just exclude the dress, do the color changes different and add suspenders like on the original pattern.
I am sure you can do it!
I've added whiskers by using black perlon thread, so if you got some lying around, you can use that. However, if she is going to be used as a toy, I would recommend you to use some thin, black yarn and tie it with a knot so it doesn't fall off.
The hooks
The hooks that I am using are the ones from Clover Amour. I highly recommend these hooks, because they are simply the best I've tried! I got the set from my husband for Christmas last year and I've been only using these and the ones from Tulip. But honestly, I prefer the hooks from Clover because they have such a nice grip, that are great to prevent wrist pain. Also, my stitches look better when I use these hooks and I do crochet faster with them!
PDF version
The pattern is available in German, English, and Norwegian. Also, the premium version has pictures that the free version doesn't

Crochet Christmas mouse Lily
This pattern is the intellectual property of Yarnhild. The pattern must not be altered, translated, copied or republished without approval. You are welcome to sell the items that you have made from my patterns, but please be sure to give me credit for the pattern if you sell online. For private use only, no commercial use. 2017 - 2019 Yarnhild ©
Abbreviations
| ch – chain |
| yo – yarn over |
| st – stitch |
| sl st – slip stitch |
| sc – single crochet |
| hdc – half double crochet |
| sc2tog – single crochet decrease |
| Round -R |
| dc – double crochet |
| blo – back loop only |
| flo – front loop only |
| mr – magic ring tr – treble crochet |
Materials used
| Schachenmayr colors white (00106), red (00115), grey (00172) pink (00398). Amount: 50 g of grey and red, 20 g of pink and white, small amount of yellow. Glitter yarn of choice. |
| Ca 5 g of fluffy yarn (scarf) |
| Crochet hook 3.0mm/E, 3.5 m. Hook to match the fluffy yarn |
| Tapestry needle |
| Scissors |
| Filling material |
| Safety eyes 10 mm |
| Pipe cleaner |
| Stitch marker |
| Information about the pattern |
| Written in US terms. All parts on the mouse are made in continuous. The parts are being crocheted separated and then sewn together. The ears are finished with the crab stitch. The body/dress is being crocheted from the top to the bottom. You can add buttons if you want at the end to make your mouse individual. The skirt for the dress is being crocheted directly on the dress in BLO and FLO. Stuff the limbs as you go. Stuff all the parts firmly, but not so you can see the filling material through the stitches. Use a size 3.0mm /5/0 until being instructed otherwise. Finished size about 30 cm/12 inches. Skill level; intermediate. |
Head. Color grey
R 1: 5 sc in a mr = 5 sc
R 2: 5 sc = 5 sc
R 3: Inc x 5 = 10 sc
R 4-5: 10 sc, for 2 rounds = 10 sc
R 6: (1 sc, inc) x 5 = 15 sc
R 7: 15 sc = 15 sc
R 8: (2 sc, inc) x 5 = 20 sc
R 9: 20 sc = 20 sc
R 10: (3 sc, inc) x 5 = 25 sc
R 11: 25 sc = 25 sc
R 12: (4 sc, inc) x 5 = 30 sc
R 13: 30 sc = 30 sc
R 14: (5 sc, inc) x 5 = 35 sc
R 15: 35 sc = 35 sc
R 16: (6 sc, inc) x 5 = 40 sc
R 17: (7 sc, inc) x 5 = 45 sc
R 18- 19: 45 sc for 2 rounds = 45 sc
R 20: (2 sc, inc) x 5, 7 sc, sc2tog, (2 sc, sc2tog) x 4 = 45 sc
21 -26: 45 sc for 6 rounds = 45 sc
R 27: (7 sc, sc2tog) x 5 = 40 sc
R 28: (6 sc, sc2tog) x 5 = 35 sc
Sew on a nose with pink yarn. Start stuffing. Fasten safety eyes on round 14-16. Skip 5 sc from the beginning of the round, so that you place the eyes where the increases start. Leave 9 sc space apart.
R 29: (5 sc, sc2tog) x 5 = 30 sc
R 30: (4 sc, sc2tog) x 5 = 25 sc
R 31: (3 sc, sc2tog) x 5 = 20 sc
R 32: (2 sc, sc2tog) x 5 = 15 sc
R 33: (1 sc, sc2tog) x 5 = 10 sc
R 34: sc2tog x 5 = 5 sc
Sl st in first st, cut the yarn. Sew the hole closed.
Ears, colors grey and pink. Start with pink. Make 2.
R 1: 6 sc in a mr = 6 sc
R 2: Inc x 6 = 12 sc
R 3: (1 sc, inc) x 6 = 18 sc
R 4: (2 sc, inc) x 6 = 24 sc
R 5: (3 sc, inc) x 6 = 30 sc
Change to grey
R 5: Ch 1, 1 crab stitch in each stitch. Sl st in the first st, cut the yarn leave a long tail for fastening.
How to do the crab stitch Do not turn your work as normal. Chain 1, insert the hook in the stitch to the right from your chain 1, yarn over and pull up a loop, yarn over and pull through two loops. It’s like a normal single crochet but it is being crocheted in reverse. Watch a video here.
Fold the tip of the ears so they get a little pointy and sew back and forth a few times. Sew on ears on the head on rounds 25-26.
Body, color grey and red. Start with red
R 1: 12 sc in a mr = 12 sc
R 2-4: 12 sc for 3 rounds = 12 sc. Don’t pull close!
R 5: (1 sc, inc) x 6 = 18 sc
R 6-7: 18 sc for 2 rounds = 18 sc
R 8: (2 sc, inc) x 6 = 24 sc
R 9: 24 sc = 24 sc
R 10: (3 sc, inc) 6 x = 30 sc
R 11: 30 sc = 30 sc
R 12: (4 sc, inc) x 6 = 36 sc
R 13-14: 36 sc for 2 rounds = 36 sc
R 15: (5 sc, inc) x 6 = 42 sc
R 16-17: 42 sc for 2 rounds = 42 sc
R 18: (6 sc, inc) x 6 = 48 sc
19-25: 48 sc for 7 rounds = 48 sc
26: (7 sc, inc) x 7= 54 sc
R 27-28: 52 sc for 2 rounds = 54 sc
R 29: 54 sc in FLO = 54 sc
Now the skirt is being crocheted. Crochet through both loops like normal.
R 1: hdc inc in every stitch = 108 hdc
R 2-5: 108 hdc for 4 rounds = 108 hdc (feel free to add rounds if you want your skirt to be longer).
Add glitter yarn and crochet with 2 strands, glitter yarn and the red yarn. Size up to 3.5 mm/ E.
With both strands with red and glitter yarn: 1 sc in the first stich, ch 3 and sl st in the first ch. (picot stitch), *4 sc, 1 picot stitch in the 4th sc*, repeat all the way around. 1 sc in the last 4 sc. = 108 sc, 27 picot stitches. Sl st in the first sc, cut the yarn, weave in ends.
The pictures are from a different pattern using the same technique. How to do a picot stitch.
Attach grey yarn in the loop that is left from round 28. Change hook to size 3.0mm/E
R 30: BLO 54 sc = 54 sc
Through both loops.
R 31: (7 sc, sc2tog) x 6 = 48 sc
R 32: (6 sc, sc2tog) x 6 = 42 sc
R 33: (5 sc, sc2tog) x 6 = 36 sc
R 34: (4 sc, sc2tog) x 6 = 30 sc
R 35: (3 sc, sc2tog) x 6 = 24 sc
Stuff the body.
R 36: (2sc, sc2tog) x 6 = 18 sc
R 37: (1sc, sc2tog) x 6 = 12 sc
R 38: sc2tog x 6 = 6 sc
Sl st in the first st, cut the yarn and fasten off, weave in ends.
Arms, colors white and red. Start with white.
Make 2
R 1: 6 sc in a mr = 6 sc
R 2: inc x 6 = 12 sc
R 3: (1 sc, inc) x 6 = 18 sc
R 4 - 5: 18 sc for 2 rounds = 18 sc
R 6: (1 sc, sc2tog) x 6 = 12 sc
Change to red. Stuff as you go.
R 7 – 26: 12 sc for 19 rounds = 12 sc
Sl st in the first st, cut the yarn and fasten off, leave a long tail for fastening.
Feet, colors white and grey. Start with white.
R 1: 6 sc in a mr = 6 sc
R 2: Inc x 6 = 12 sc
R 3: (1 sc, inc) x 6 = 18 sc
R 4: (2 sc, inc) x 6 = 24 sc
R 5 – 7: 24 sc for 3 rounds = 24 sc
R 8: sc2tog x 6, 12 sc = 18 sc
R 9 (1 sc, sc2tog) x 3, 9 sc = 15 sc.
Change to grey. Stuff as you go
R 10 – 38: 1 sc in each stitch for 28 rounds.
Sl st in the first st. Fasten off, leave a long tail for fastening.
Tail, color grey
Make 34 chains or longer if you want to. Sl st your way back to the beginning. Use the two yarn tails at the top of the tail and pull it through the dress and make a knot. Weave in ends.
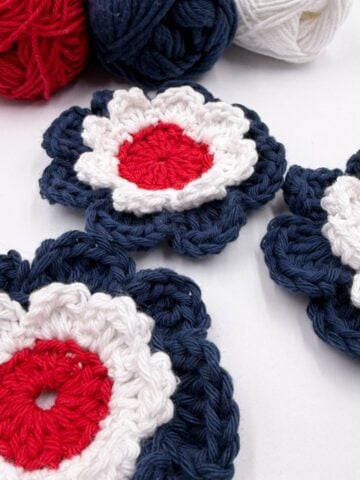
Flower color yellow and red, Start with yellow
R 1: 12 sc in a mr = 12 sc
Change to red.
R 2: ch 3, in same st: *1 dc, 1 tr, 1 dc, 1 hdc, sl st in next * rep 4 times.
R 3: *sl st to the top of the tr, ch 3, sl st in the first ch. *Repeat all around. Sl st in the first sl st. Fasten off, leave a tail for fastening.
Scarf, color of choice
Just use whatever fluffy yarn you have and a crochet hook that the label asks for.
Make a chain that measures about 34 cm, turn and do 1 dc in each stitch. If you want your scarf to be thicker, just chain 3, turn and add another row. Fasten off, weave in.
Assembly
Sew the head to the body. Fasten a pipe cleaner through some stitches on the head (rows 20-23. Just put the pipe cleaner through a couple of stitches (see pictures). Find a good place for the head. I recommend in the middle between rows. 20 – 23. For extra support for the head, sew on the arms to the body just below the head. You can fasten them a couple of rows under the head if you like the look better. Sew the feet on the bottom of the body. Decide where you want them to be. Sew the flower to the ear. Tie the scarf on the neck 2 times for extra support for the head. Sew on whiskers.