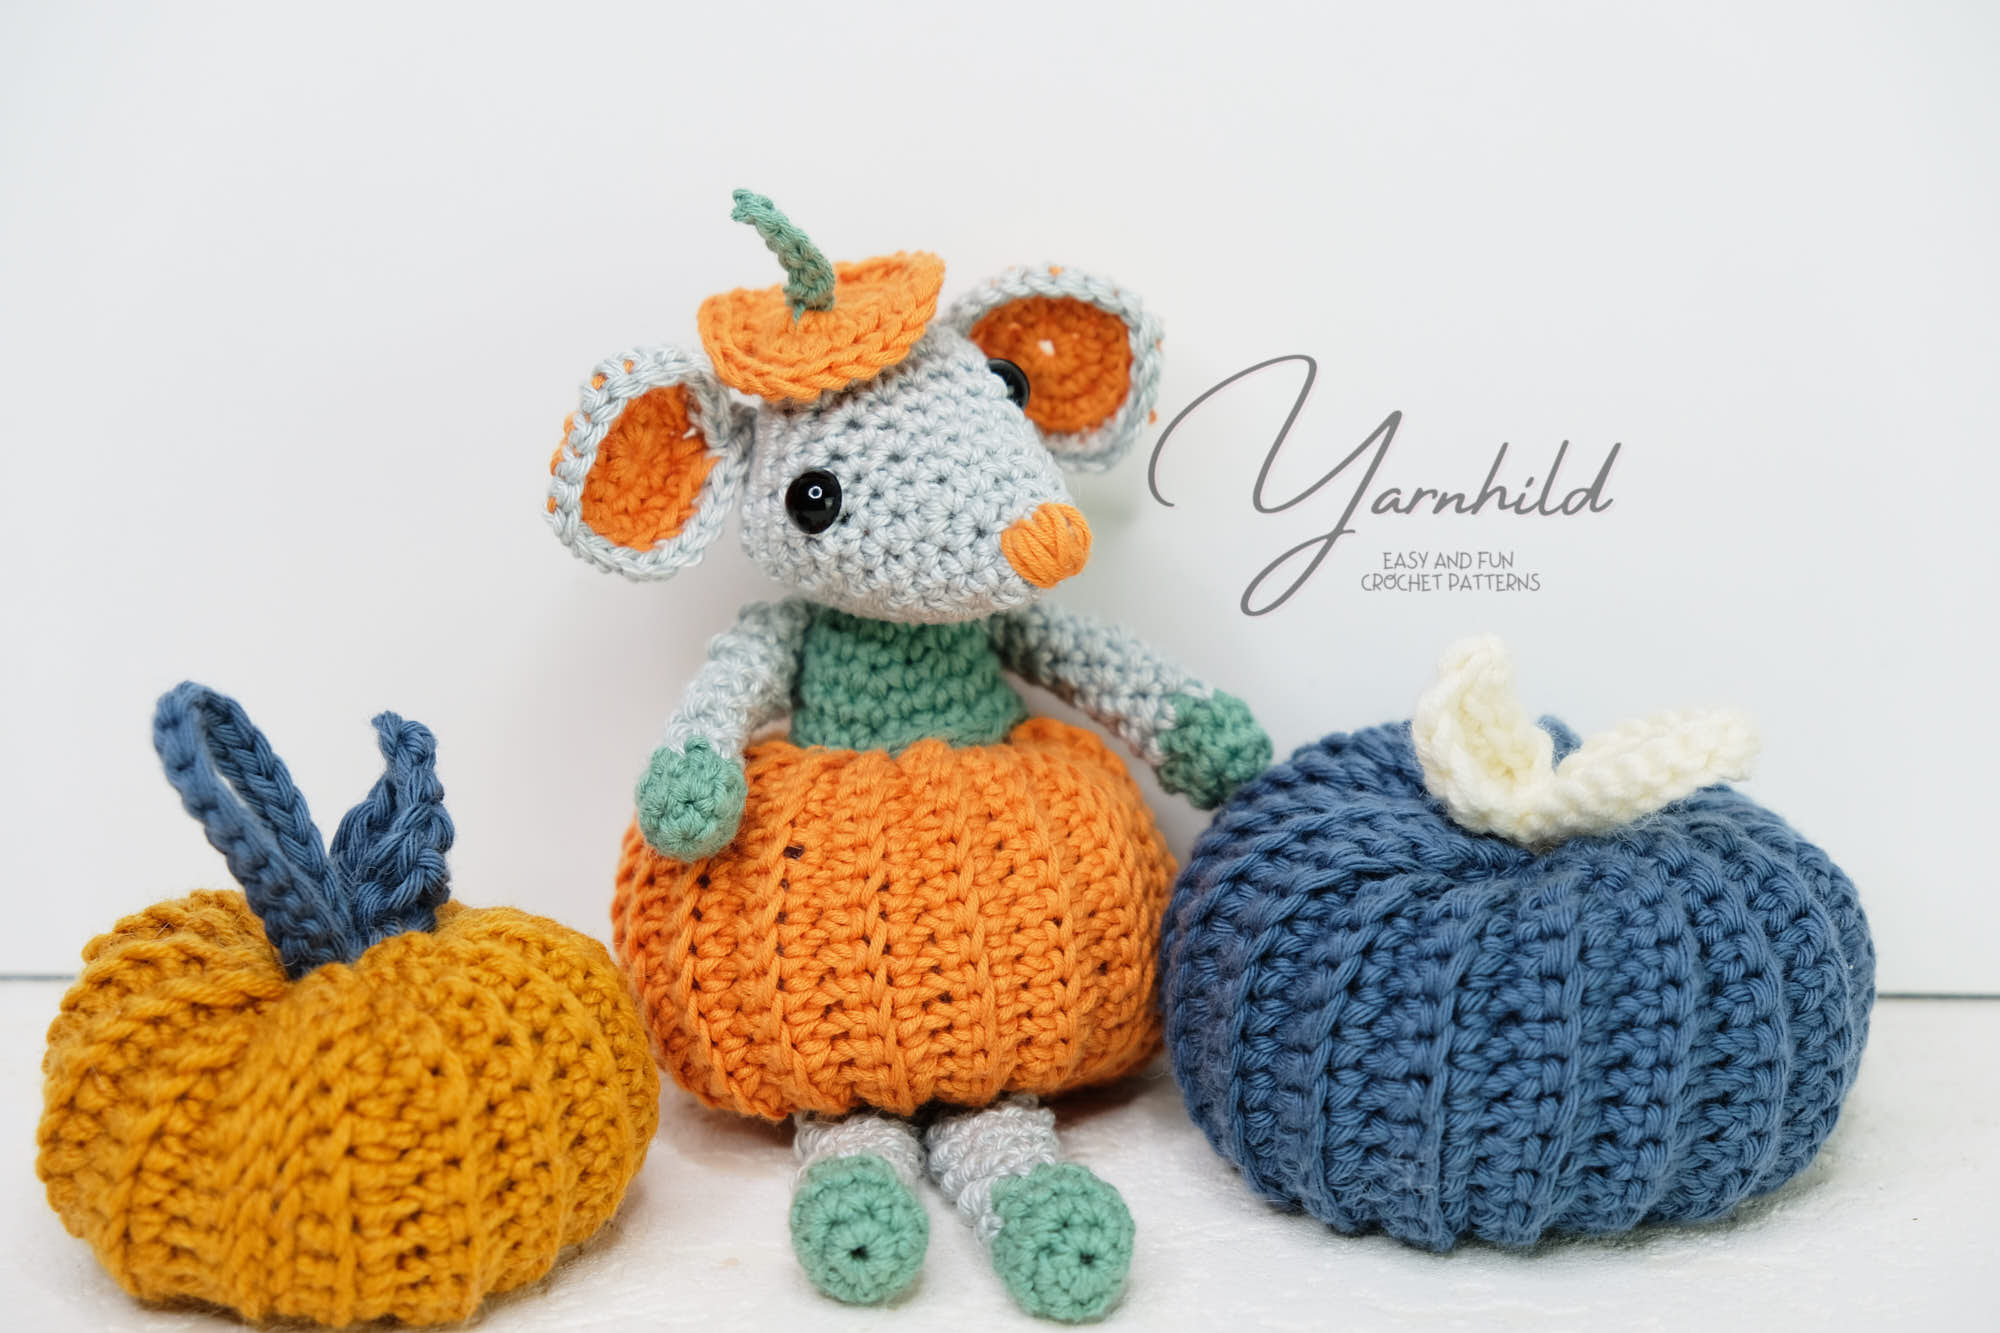
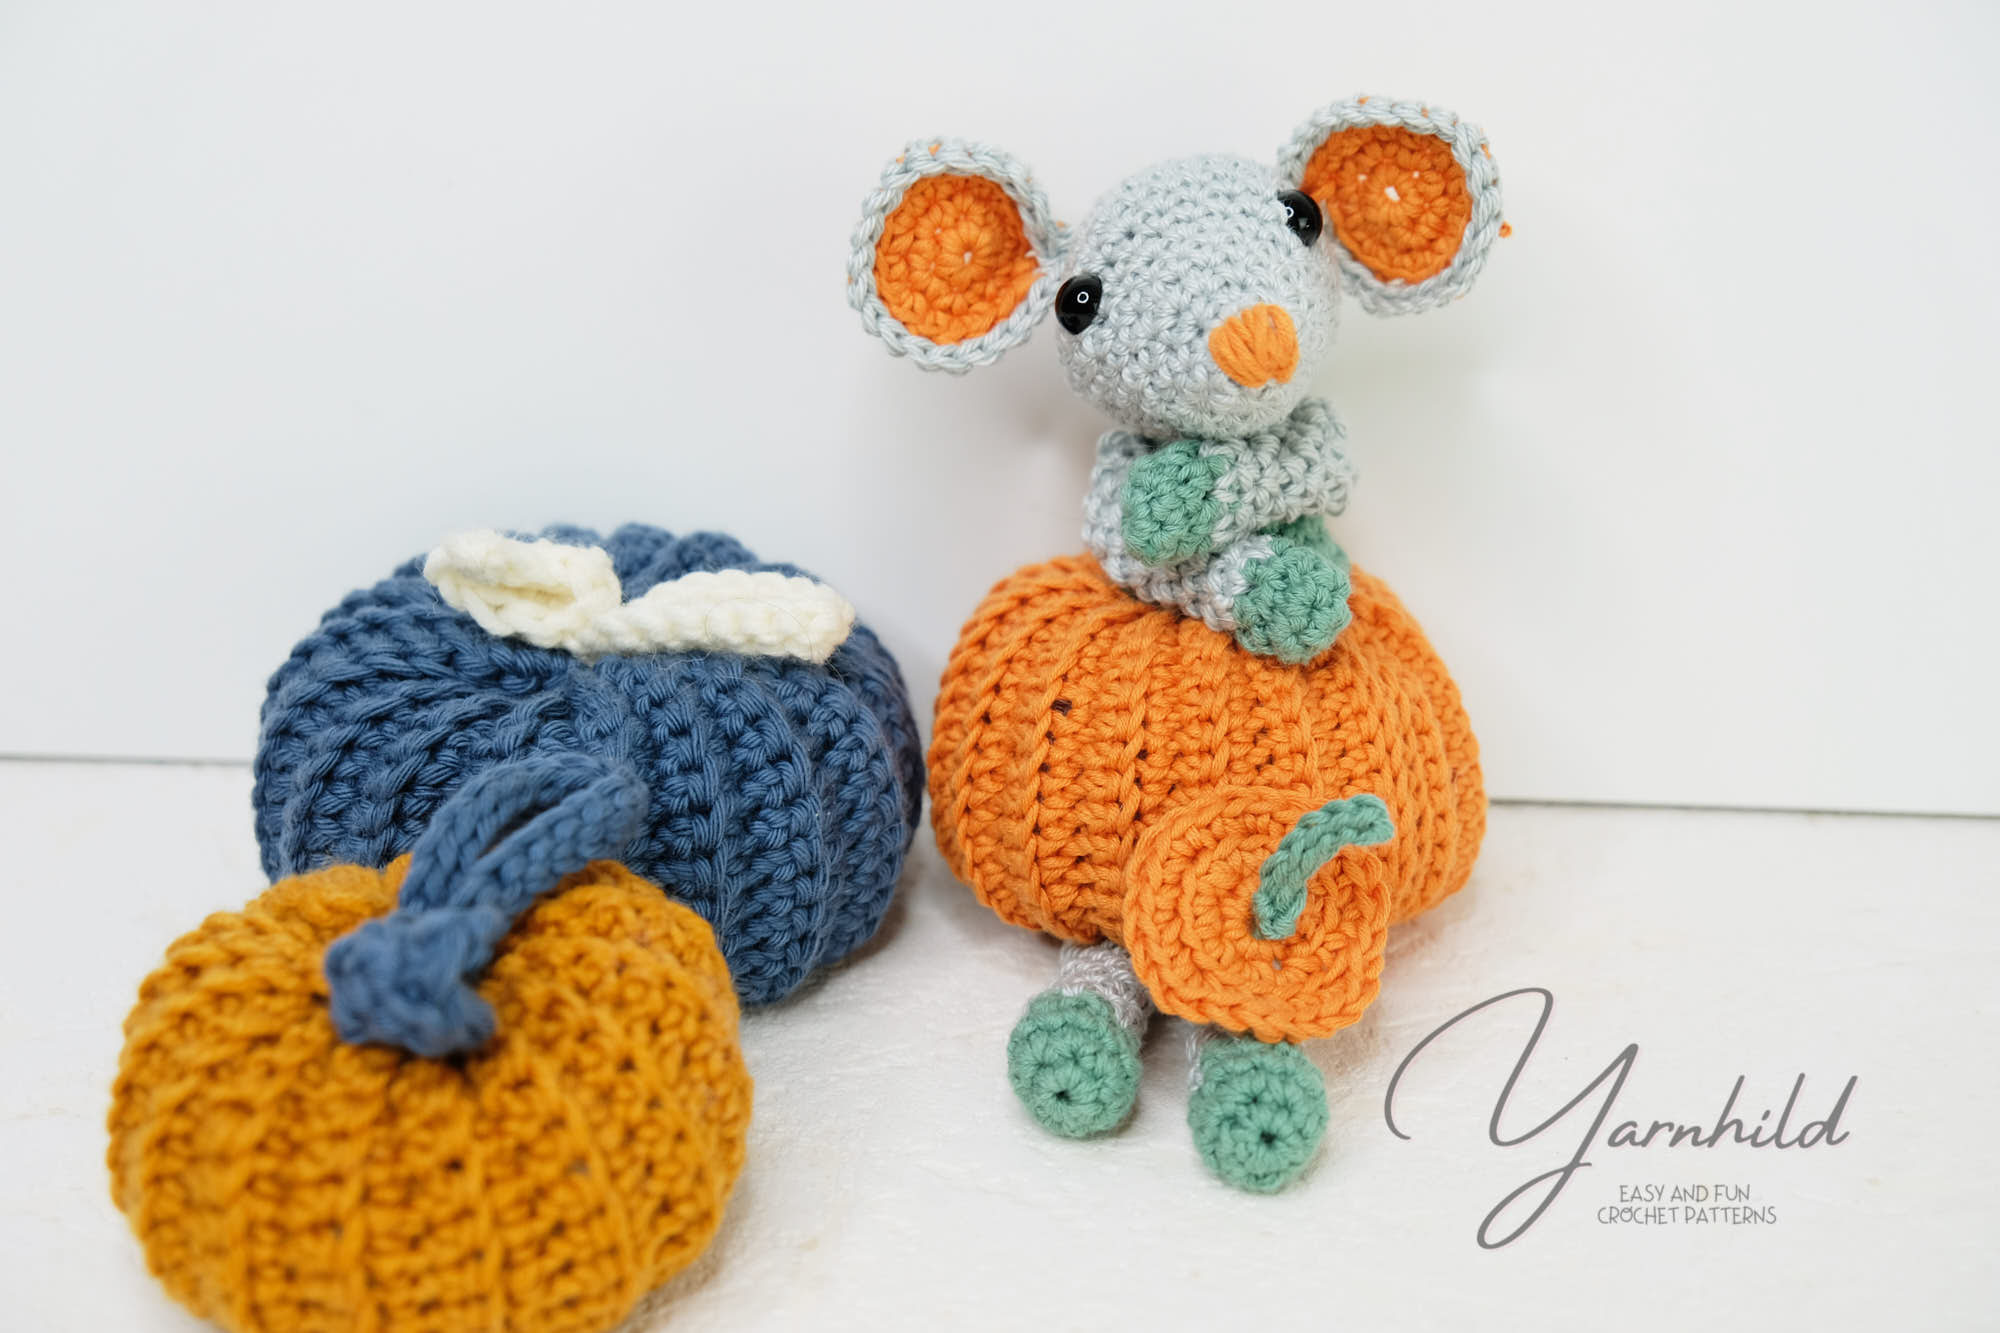
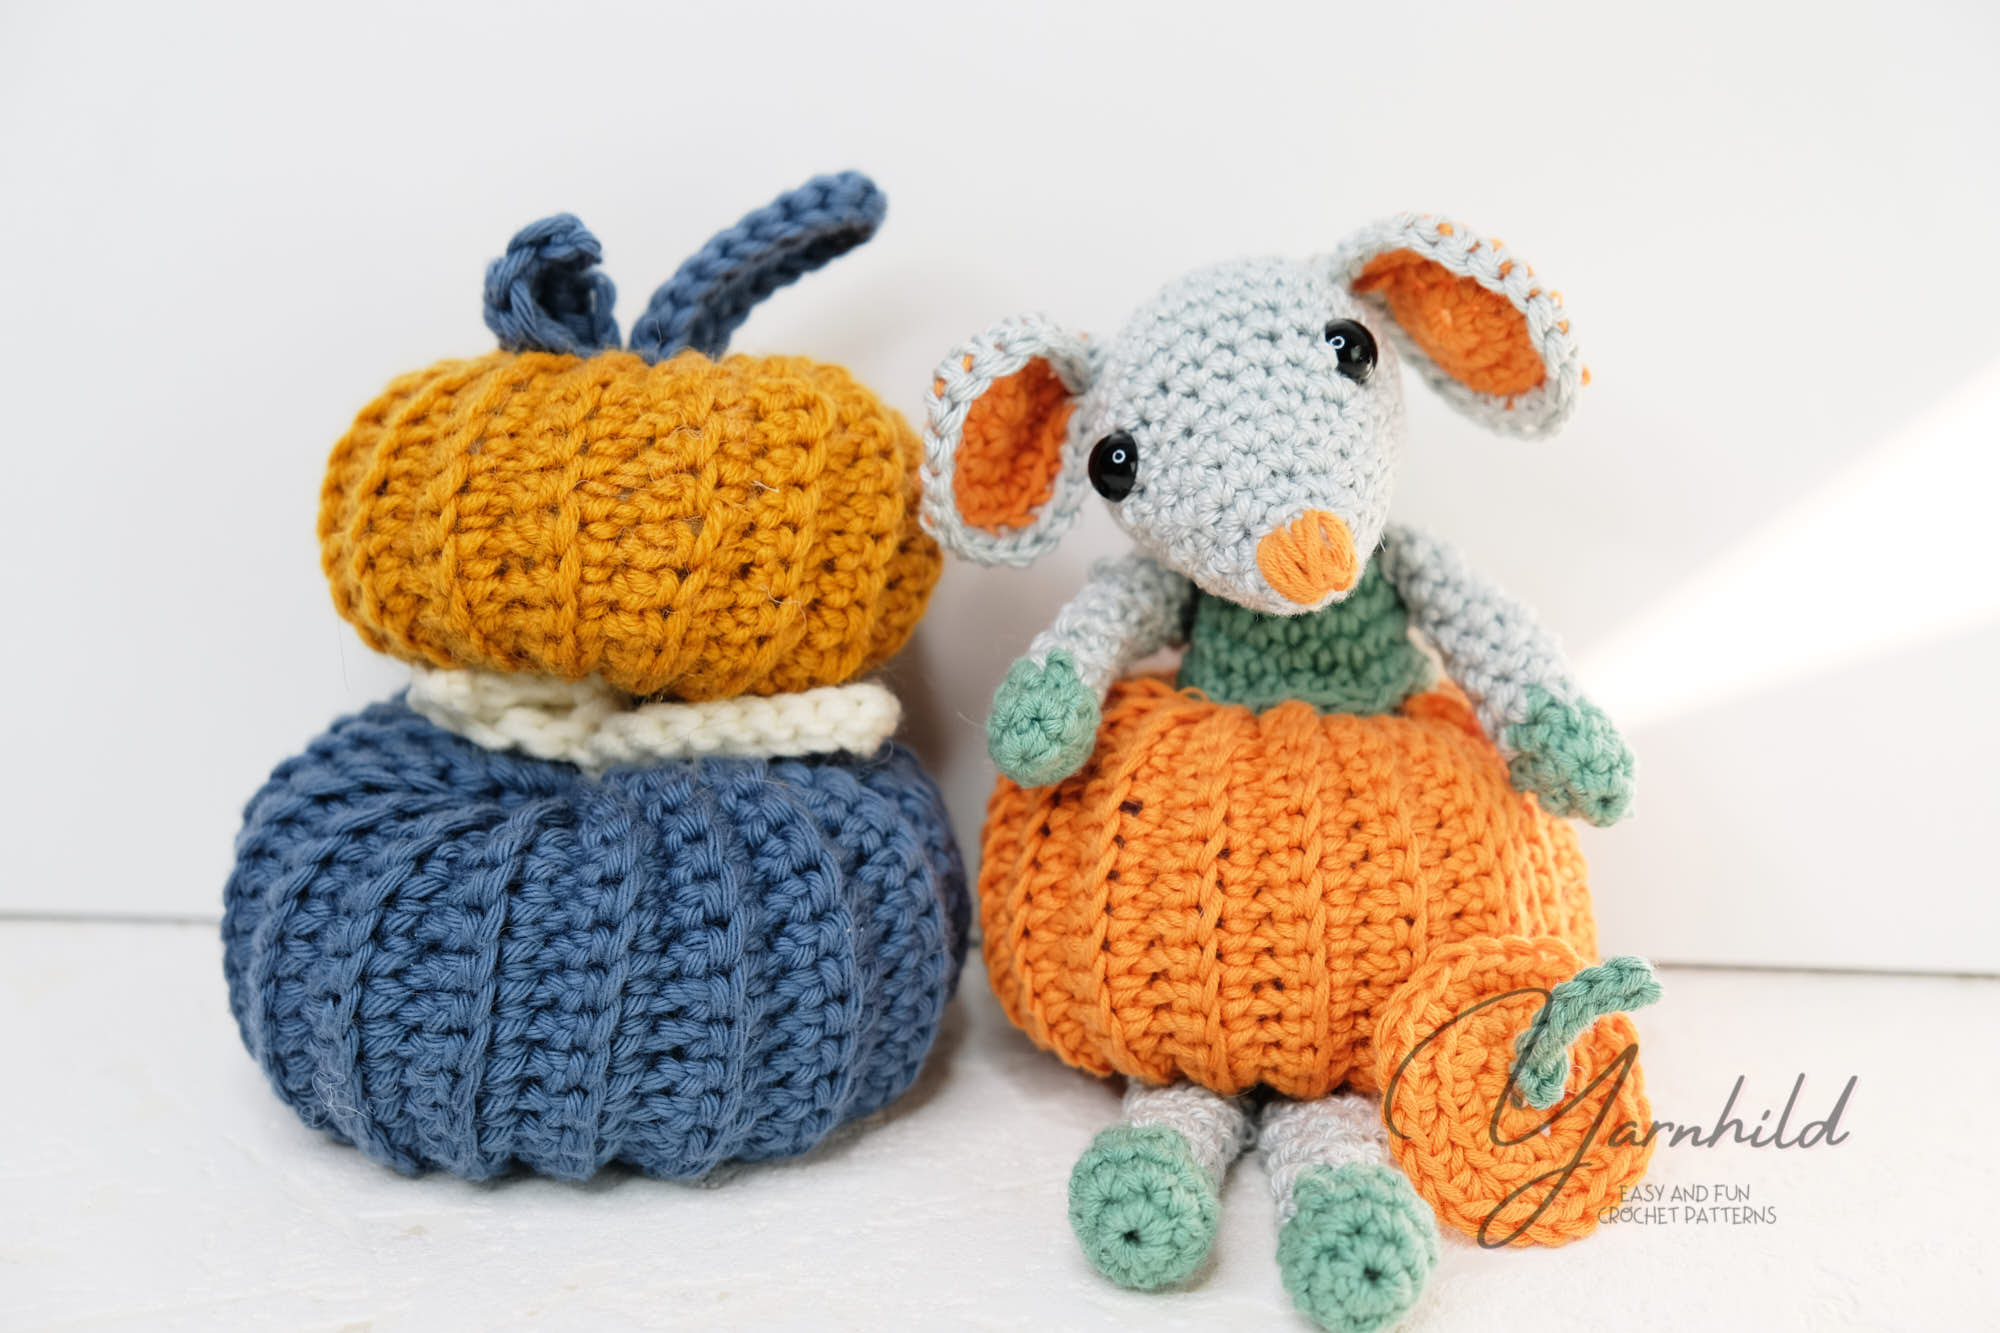
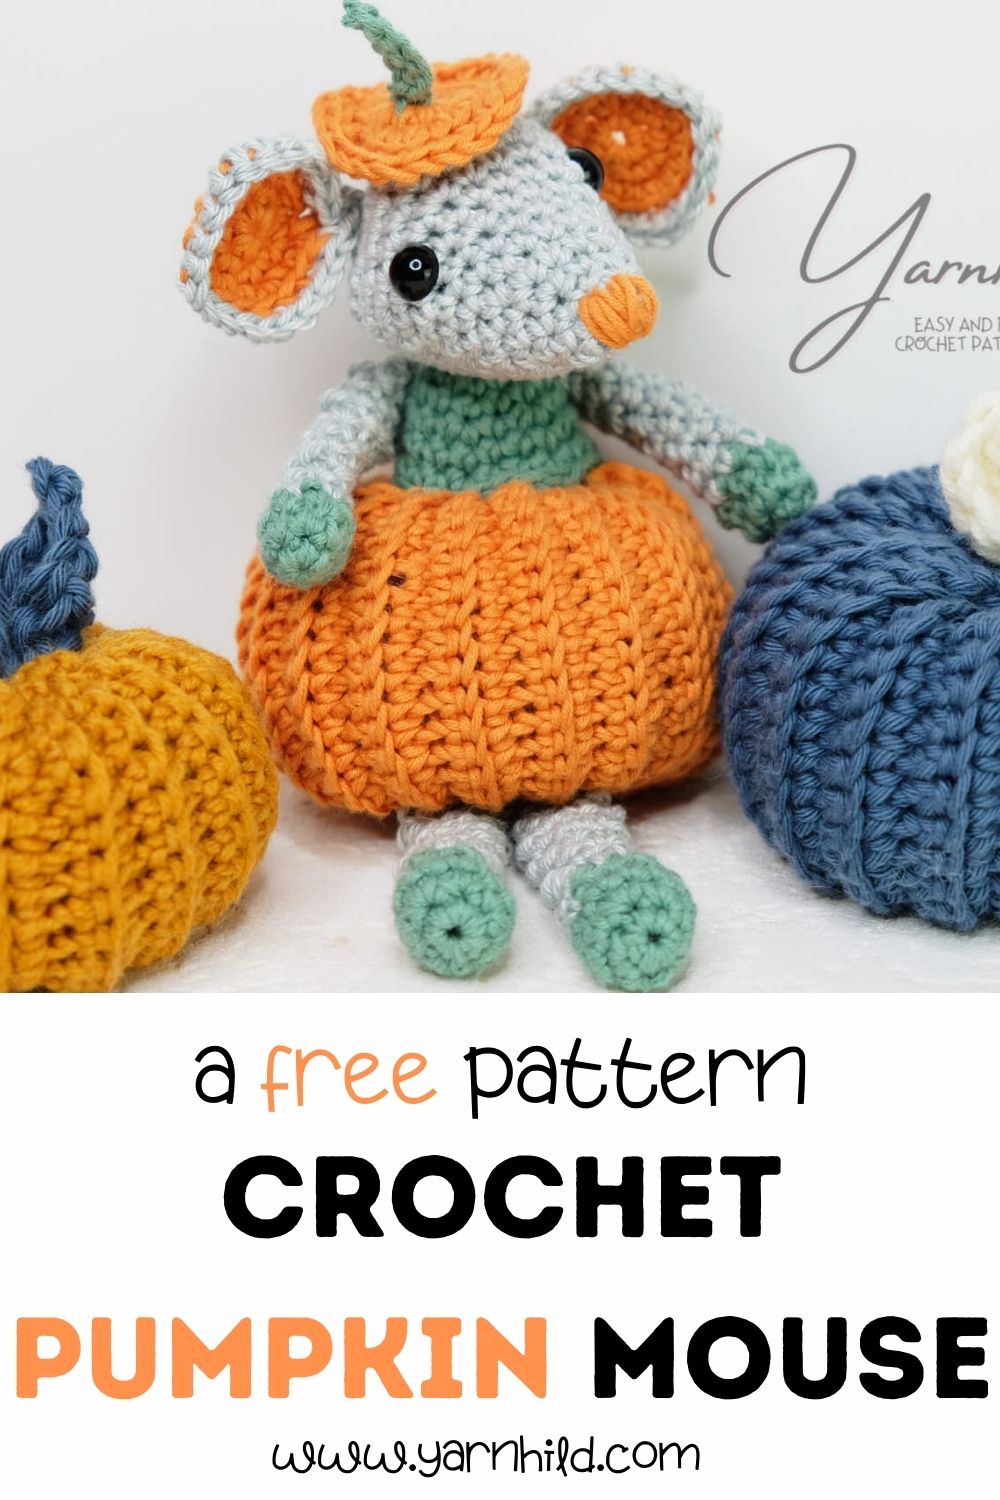
Lisa the crochet pumpkin mouse - a free pattern
Today we are exited to share the pattern for Lisa the crochet pumpkin mouse! This is the last pattern for the Halloween CAL. This little mouse is perfect for fall and adds a nice twist to the regular pumpkin.
The inspiration behind the design
Earlier this week we released the pattern for the pumpkin. The idea to add a mouse on it was inspired by other designers and I used my own Lisa the mouse pattern and turned into this cute pumpkin mouse.
I sometimes include affiliate links in my blog posts. That means that I earn a small commission if you purchase a product that I recommend, on no extra costs on your behalf. Thank you for your support!
Materials
The pumpkin is made with sports weight yarn and a 3.0 mm crochet hook. Feel free to use thicker yarn and a bigger hook for a bigger mouse. The finished mouse is about 18 cm, including the feet.
Show me your finished mouse
I love, love to see your finished projects! Please go and find me on Instagram if you want to share a picture with us! Also, there is a cozy crochet group on Facebook that you can join. It's called Yarnhild crochet club.
PDF pattern in Norwegian and German
The pattern is available in German and Norwegian too. The PDF for all languages (including English) can be found on Ravelry and Etsy.
Halloween crochet a long 2020
Lisa the pumpkin mouse will be the last pattern in this crochet a long. If you missed the other parts, you can check them out here:
Pin this for later on Pinterest!

Crochet pumpkin mouse
This pattern is the intellectual property of Yarnhild. The pattern must not be altered, translated, copied or republished without approval.You are welcome to sell the items that you have made from my patterns, but please be sure to give me credit for the pattern that you sell online. For private use only, no commercial use. 2020 – Yarnhild
Abbreviations – US terms
Ch - chain
R – round
St – stitch
Sl st – slip stitch
Sc – single crochet
Sc dec – single crochet decrease
Sc inc – single crochet increase, 2 single crochet in one stitch
Mr – Magic ring
BLO – back loop only
Materials
- Sports weight yarn in grey, orange and green. You’ll need about 25 g in orange and 25 g grey and 10 gram in green.
- Crochet hook 3.0mm (or fitting for the yarn).
- Filling materials.
- Scissors
- 8 mm safety eyes
About the pattern
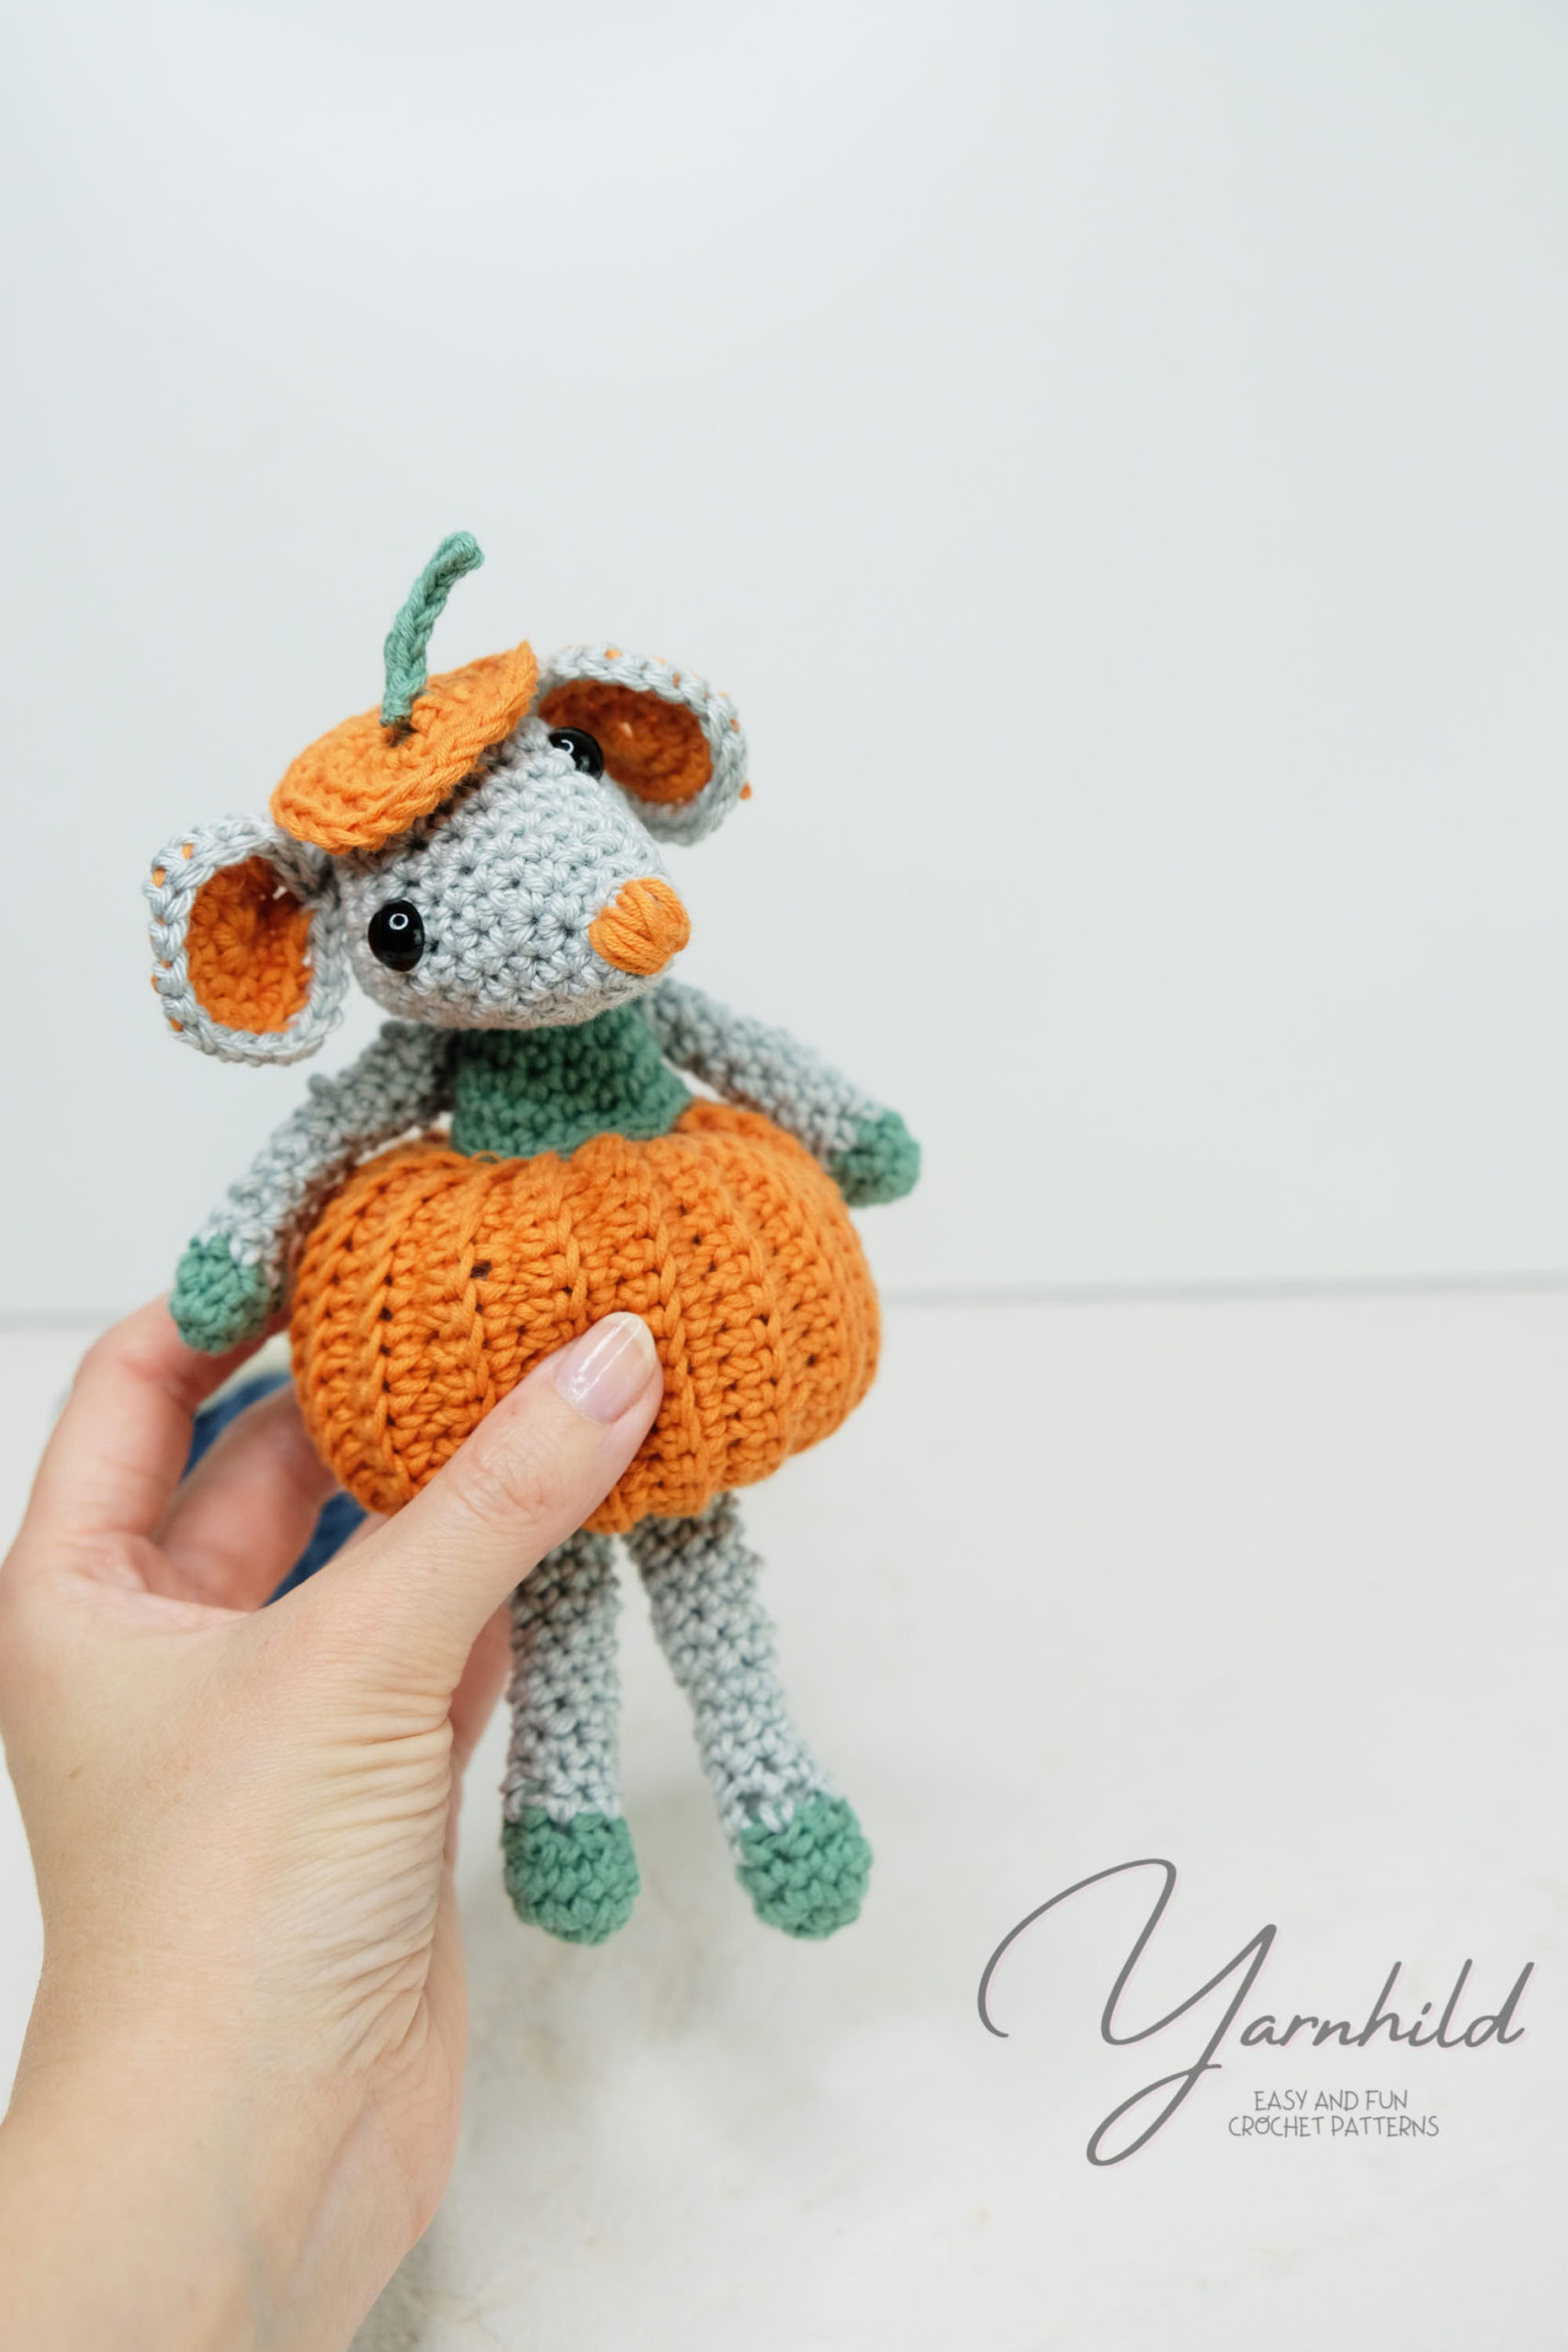
The mouse is made in continuous rounds. Use a stitch marker and move it up as you go. The body is a pumpkin and the mouse is coming out of the pumpkin. The pumpkin is made in rows and in back loop only.
All parts are being crocheted separately and sewed on. I did not sew on the hat, you can do so if you want to. All parts are being crocheted with a 3.0 mm crochet hook.
Difficulty level: Intermediate.
Finished size: 18 cm tall.
Head
Use grey colored yarn. Use a stitch marker and move it up as you go
R 1: 4 sc in a mr = 4 sc
R 2: sc inc x 4 = 8 sc
R 3: 8 sc
R 4: (1 sc, sc inc) x 4 = 12 sc
R 5: 12 sc
R 6: (2 sc, sc inc) x 4 = 16 sc
R 7-8: 16 sc (for 2 rounds)
R 9: (3 sc, sc inc) x 4 = 20 sc
R 10: 20 sc
R 11: (4 sc, sc inc) x 4 = 24 sc
R 12: (3 sc, sc inc) x 6 = 30 sc
R 13-14: 30 sc (for 2 rounds)
R 15: (3 sc, sc dec) x 6= 24 sc
Attach safety eyes between round 11 and 12 here. Leave 6 sc space between the eyes. Stuff the head with some filling material. Sew on the nose with orange yarn. I just sewed back and forth on round 1 to make the nose.
R 16: (2 sc, sc dec) x 6= 18 sc
R 17: (1 sc, sc dec) x 6= 12 sc
Finish stuffing.
R 18: sc dec x 6 = 6 sc
Sl st in the first stitch and fasten off. Sew the hole closed.
Tail
In grey yarn.
Chain 20, sl st and fasten off. Leave a strand for fastening.
Ears
Make 2
Use orange and grey colored yarn. Use a stitch marker and move it up as you go. Start with orange.
R 1: 6 sc in a mr =6 sc
R 2: sc inc x 6 = 12 sc
R 3: (1 sc, sc inc) x 6 = 18 sc
Change to grey and work in back loop only (BLO
R 4: (sc inc, 2 sc) x 6 = 24 sc
Sl st in the first st and fasten off. Leave a long tail. Pinch the ear flat and sew back and forth a couple of times so it gets a little pointy.
Body part
In green.
Note. The body part is small, this is intended. It is supposed to stick out if the pumpkin. Leave a tail at the beginning for fastening later.
R 1: 6 sc in a mr =6 sc
R 2: sc inc x 6 = 12 sc
R 3: 12 sc
R 4: (1 sc, sc inc) x 6 = 18 sc
R 5: 18 sc. Sl st in the first st and fasten off. Leave a long tail for fastening.
Pumpkin
Go here to get the pattern for the pumpkin.
Hands
Make 2.
Use green and grey yarn. Start with green.
R 1: 6 sc in a mr =6 sc
R 2: sc inc x 6 = 12 sc
R 3: sc dec x 6 = 6 sc
Stuff this part lightly. The rest of the arm is not being stuffed. Change to grey.
R 4-14:
6 sc (for 11 rounds.)
Pinch the hole flat and close it with single crochet. Fasten off and leave a long tail for sewing.
Feet
Make 2.
Use green and grey yarn. Start with green.
R 1: 6 sc in a mr =6 sc
R 2: sc inc x 6 = 12 sc
R 3: 12 sc
R 4: sc dec x 6 = 6 sc
Stuff this part lightly. The rest of the feet is not being stuffed
R 5-16: Change to grey.
6 sc (for 12 rounds.)
Pinch the hole flat and close it with single crochet. Fasten off and leave a long tail for sewing.
Pumpkin hat
In orange
R 1: Rnd 1: 8 sc in a mr =8 sc
R 2: sc inc x 8 = 16 sc
R 3: Work in BLO (1 sc, sc inc) x 8 = 24 sc
Sl st in the first st and fasten off. If you want to sew on the hat to the head, leave a longer strand
Pumpkin green
In green colored yarn
Chain 7, sl st 6 times and fasten off. Sew the green part in the middle of the hat. Weave in ends.
Assembly
Sew the head to the small, green body part. Sew the body part to the pumpkin part. Add stuffing before closing. I sewed the body part on the head on rounds 5-6. Sew on the ears on rows 4-5 with 7 sc stitches apart.
Sew on the arms on the body on rows 2-3.
Find the position that you like best. I sewed the arms on the back side. Sew on the tail on the back.
Sew on the feet in the middle under the pumpkin.

This is adorable.
Thank you so much!