Elsa the snow angel - English and Norwegian pattern
This blog posts may contain affiliate links, read more about it here. Hi fiber friends! Today I am sharing my Elsa the snow angel crochet pattern with you, for free! This was a premium pattern last year and this Christmas I am giving it away to all of you! Many of you have already made her, and I am hoping to see even more crochet angles this Christmas!
Scroll for the Norwegian part! Se lenger ned for den norske delen!
Klicke hier für die Deutsche Anleitung!
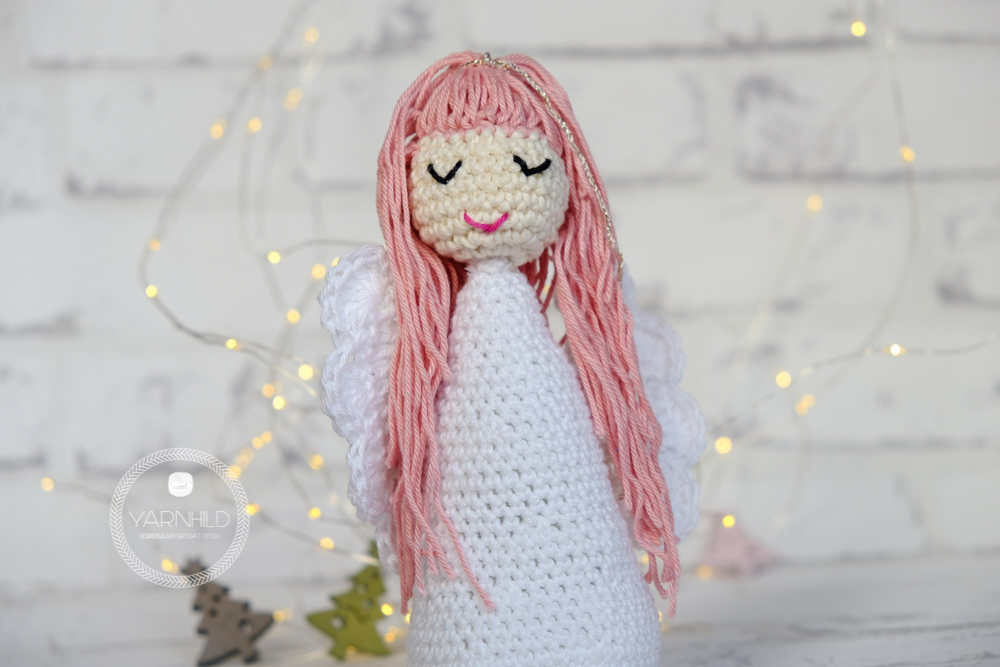
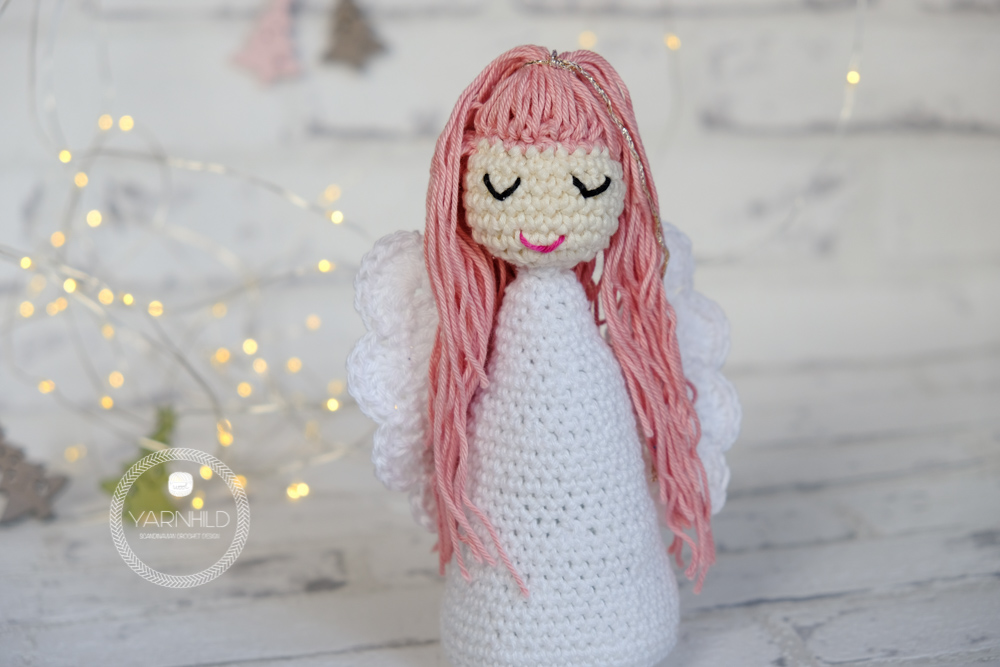
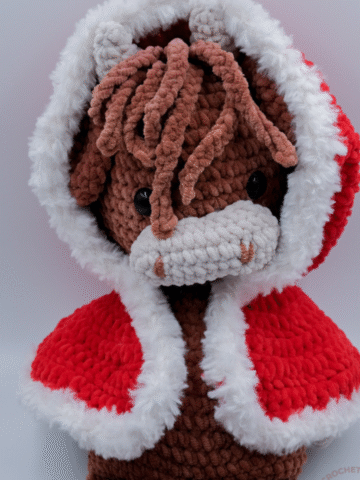
This crochet angel is pretty easy to make. You just need to know how to do the basics and then you're good to go! The only part that can be a little annoying is attaching all those strands of hair. But it is so worth it! Look at that thick, gorgeous hair!
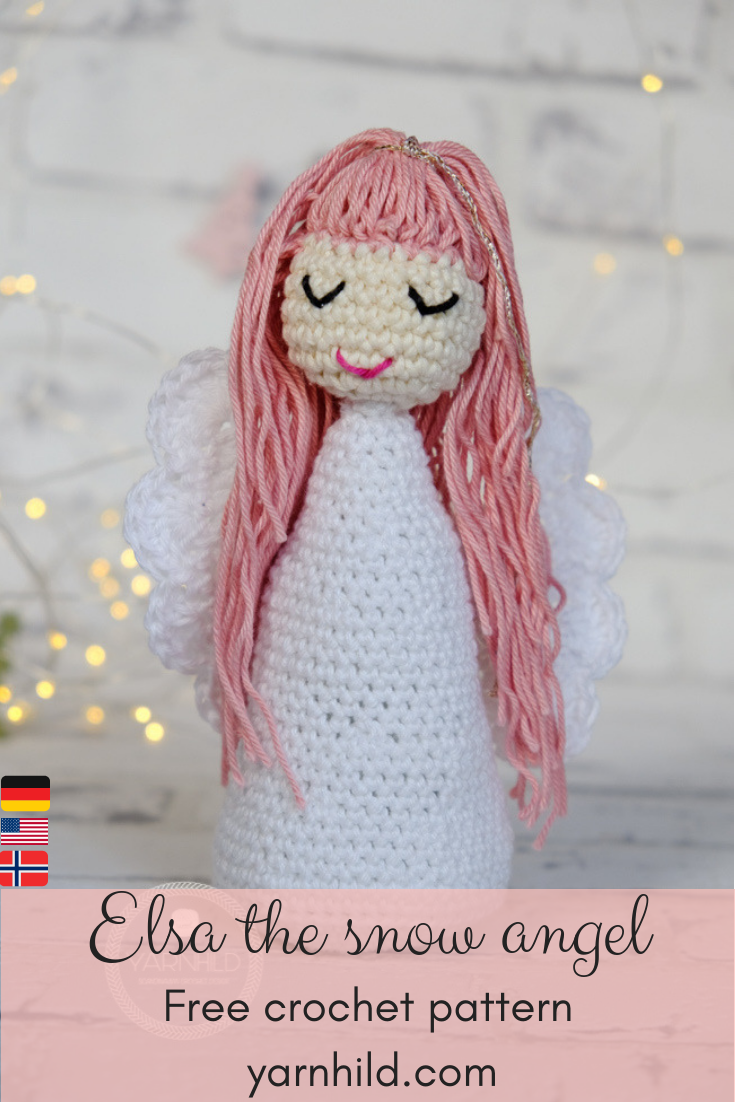
I've named this crochet angel Elsa, because I think she looks a little like Elsa from that Disney movie. I made a ponytail with some glitter wool that I've found to make her sparkle a little extra.
If you want to make a crochet angel, please show us a picture when you're done! I love seeing your work. You are welcome to join our Facebook group - Yarnhild crochet club and share the picture with us. If you prefer Instagram or Pinterest, you can share a picture there too. Just use the #yarnhild and tag me so that I see it.
Before you scroll down to your free crochet angel pattern, take a moment to sign up for our Newsletter! You'll get inside scoops and an email every time there is a new pattern on the blog. It's also free!
Take me to that newsletter!
You can also purchase the print friendly PDF. In addition to English, the pattern is also available in German and Norwegian. You'll get 3 PDF's, one for each language. The PDF version also has pictures that the free pattern don't.
Yes, take me to Ravelry
Get the crochet angel pattern on Etsy
Scroll for the Norwegian version. Se nederst på siden for den norske oversettelsen!
Crochet Angel pattern
Elsa the snow angel
©Yarnhild
This pattern is an intellectual property of Yarnhild. The pattern must not be altered, translated, copied or republished without approval.You are welcome to sell the items that you have made from my patterns, but please be sure to give me credit for the pattern of you sell online. No mass production. For private use only, no commercial use. 2018 – Yarnhild ©
Abbreviations used
- ch – chain
- yo – yarn over
- st – stitch
- sl st – slip stitch
- sc – single crochet
- dc – double crochet
- BLO - back loop only
- inc – Increase (single crochet increase, two single crochet in one stitch)
- sc2tog – Decrease (2 single crochet together)
- Rnd – round
Materials
- Crochet hook size 3,5mm/E I love the Clover amour hooks
!
- Color head beige, color hair, light pink
- Body and wings: white
- Yarn Drops Muskat: Off white (08) 5 g/0,18 oz light pink (06) 20 g/0,70 Oz, white (18) 40 g/1,41. A small amount of black for the eyes and red/pink for the mouth.
- Filling material
- Small bag of rice or sand for extra stability (optional)
- Pipe cleaner
Information
The pattern is written in US terms Any cotton yarn can be used, just make sure that the yarn matches the hook. The head and the body are made in continuous rounds, use a stitch marker. The wings are made in rows.
Head. Color off white
Start with pink.
Rnd 1) 6 sc in a magic ring (6 sc)
Rnd 2) 2 sc in each stitch. (12 sc)
Rnd 3) * 1 sc in next sc, 2 sc in next. * Repeat from *-*(18 sc)
Rnd 4) * 1 sc in next 2 sc, 2 sc in next. * (24 sc)
Attention, color change after row 5!
Rnd 5 - 8). 1 sc in each stitch for 4 rounds. Change color to off white after round 5. (24 sc)
Rnd 9). *1 sc in the next 2 sc, sc2tog* (18 sc) Sew on eyes and mouth and stuff the head with some filling material.
Rnd 10) *1 sc in next sc, sc2tog* (12 sc)
Rnd 11) sc2tog, repeat 6 times. (6 sc) Sew the hole closed.
How to make the hair
Now we are going to make the hair for the angel. Cut a bunch of strands, how many depends on how think you want the hair to be. I think I used about 50 strands or so. I made my strands about 12 inches, but you can make them shorter however you see fit. The more strands you make, the thicker the hair will be. Cut the strands and make them about 12 inches
Fold the strands in half. We are going to attach them on the pink part on the head. Attach the hair on the pink part. Put the hook under the stitch, then grab the hair yarn with the hook. Pull through and pull up a strand from the hair. Yarn over and make a slip stitch here and let go of the strand. Like you’re making a knot but you’re using the hook to do it.
After you have attached the hair around round 9, work your way over the rest of the pink part. If you want the hair to be thicker just attach more strands on the pink back part of the head, when you’re done make a ponytail at the top of her head.
Body, color white (18)
The body is worked from the bottom up. If you want to add a little more stability to your angel, you can add a small bag of rice or sand from row 17.
Rnd 1) Make a magic ring, ch 1 and do 6 sc in the ring.
Rnd 2) 2 sc in each sc. (12 sc)
Rnd 3) 1 sc in next sc, inc (18 sc)
Rnd 4) 1 sc in next 2 sc, inc. (24 sc)
Rnd 5) 1 sc in next 3 sc, inc (30 sc)
Rnd 6) 1 sc in next 4 sc, inc (36 sc)
Rnd 7) 1 sc in next 5 sc, inc (42 sc)
Rnd 8) 1 sc in next 6 sc, inc (48 sc) Now we are going to work in the back loop only (BLO)
Rnd 9) 1 sc in each sc in BLO (48 sc)
The next round we are going to work through both loops as normal.
Rnd 10) *1 sc in next 6 sc, sc2tog* (42 sc)
Rnd 11-13) 1 sc in each stitch for 3 rounds. (42 sc)
Rnd 14) *1 sc in next 5 sc, sc2tog* (36 sc)
Rnd 15- 16) 1 sc in each stitch for 2 rounds (36 sc)
Rnd 17) *1 sc in next 4 sc, sc2tog* (30 sc)
Rnd 18-23) 1 sc in each stitch for 6 rounds (30 sc)
Rnd 24) *1 sc in next 3 sc, sc2tog* (24 sc)
Rnd 25- 27) 1 sc in each stitch for 3 rounds (24 sc)
Put the bag with sand/ rise in the body here.
Rnd 28) *1 sc in next 2 sc, sc2tog* (18 sc) Start stuffing the angel here.
Rnd 29-31) 1 sc in each stitch for 3 rounds (18 sc)
Rnd 32) *1 sc in the next sc, sc2tog* (12 sc)
Rnd 33) 1 sc in each stitch for 1 round (12 sc)
Rnd 34) sc2tog 6 times. (6 sc) Sl st in the first sc. Cut the yarn, leave a long strand. Leave the hole open.
The left wing, color white (18)
Row 1) Make a magic ring and chain 3 (count as 1 dc), 5 dc in the ring. Chain 3 turn. (6 dc)
Row 2) 1 dc in the same stitch as the 3 chains, 2 dc in each stitch. Ch3, turn (12 dc)
Row 3) 3 dc in the first stitch (same as the 3 chains) 1 dc in each stitch, ch1, turn. (the ch 1 does not count as 1 sc.) (15 dc)
Row 4) 1 sc in the same stitch and in each stitch, ch 3, turn (15 sc)
Row 5) 6 dc in the first stitch, * skip the next stitch, sl st in next, skip the next, 5 dc in next* repeat 2 more times, 1 sc in the last stitch. Cut the yarn but leave some so you can attach the wings to the body
The right wing, color white (18)
Row 1) Make a magic ring and chain 3 (count as 1 dc) 5 dc in the ring. Chain 3 turn. (6 dc)
Row 2) 1 dc in the same stitch as the 3 chains, 2 dc in each stitch. Ch3, turn (12 dc)
Row 3) 1 dc in the same stitch as the chain 3 and in the next 10 stitches, 3 dc on the top of the chain 3 from last row. Ch 1, turn (15 dc)
Row 4) 1 sc in the same stitch and in each stitch, ch 1, turn (15 sc)
Row 5) 1 sc in the first stitch, sl st in next, skip 1 stitch, 5 dc in next stitch, *skip 1 stitch, sl st in next, skip 1 st, 5 dc in next* repeat 2 more times. Skip the next stitch, sl st in next, 7 dc in the top of the chain 3 stitch, Ch 1 and cut the yarn.
Assembly
Sew the wings to the body and sew the head to the body. Weave in all ends. See pictures below. To make the head more stable you can use a pipe cleaner.
I hope that you liked this crochet angel pattern. If you find any mistakes or if there is anything you don’t understand, just write me, I am happy to help! Yarnhild@outlook.com
Get more free Christmas patterns:
https://www.yarnhild.com/en/crochet-christmas-gnome/
https://www.yarnhild.com/en/mrs-claus-crochet-ornament-and-norwegian-christmas-traditions/
https://www.yarnhild.com/en/christmas-ornament/
Norsk del, Norwegian part
Dette bloginnlegget inneholder affiliate links. Les mer om dette her. Denne gangen tenkte jeg at jeg skulle bare gjøre dette helt enkelt. Så istedenfor å lage 3 forskjellige blogginnlegg. så velger jeg å legge sammen den norske og den engelske oppskriften på det samme innlegget. Det sparer meg litt tid og jeg håper at det er greit for dere!
Denne heklete engelen er veldig lett og grei å lage, også for nybegynnere! Den mest tidskrevende delen synes jeg var håret, men det var så verdt det!
Denne oppskriften kan dere få her, helt gratis! Dere kan også kjøpe pdf'en for en billig penge på strikkoteket! Da får dere mønsteret med litt bilder som gjør det lettere å hekle engelen.
Kjøp oppskriften her
Snøengelen Elsa
Norsk heklemønster
Du trenger:
- Heklekrok 3.5 mm
Jeg bruker Clover amour og er veldig fornøyd med de!
- Synål.
- Saks.
- Drops muskat
- Rest i svart i øyne litt rosa eller rød til munnen. 10 cm lang tråd med glittergarn til hestehale.
- Fyllvatt
- Eventuell piperenser for å stabilisere hodet.
- Liten pose med sand eller ris dersom du ønsker at engelen skal stå stabilt
Forkortelser
- Faste maske- fm
- Kjedemaske – kjm
- Maske – m
- Luftmaske – lm
- Sammen – sm
- Omg – omgang/er
- Runde – rnd
- Stav - st
- *-* – gjenta fra start til slutten av runden/raden
Informasjon om denne oppskriften
Det kan brukes all slags bomullsgarn til dette mønsteret, bare pass på at du velger en heklekrok som passer til garnet. Hodet og kroppen er heklet i spiralrunder og vingene er heklet i rader.
Hode, farge off white (08)
Hekles i spiralrunder. Husk markeringstråd.
Begynn med off white.
Rnd 1) Magisk ring, 6 fm i ringen. (6 fm)
Rnd 2) 2 fm i hver fm. (12 fm)
Rnd 3) *1 fm i den første fm, 2 fm i neste. * (18 fm)
Rnd 4) 1 fm i de neste 2 fm, 2 fm i neste* (24 fm)
NB! Bytt til rosa etter runde 5!
Rnd 5-8) 1 fm i hver fm i 4 runder. Husk å bytt til rosa etter runde 5 (24 fm)
Rnd 9) * 1 fm i de neste 2 fm, 2 fm sm, (18 fm)
Sy på øyne og munn og fyll hodet med vatt.
Rnd 10) *1 fm i neste fm, 2 fm sm (12 fm)
Rnd 11) 2 fm sm hele runden, gjenta totalt 6 ganger. (6 fm)
La hullet være åpent.
Håret
Nå skal vi lage håret til engelen. Klikk opp tråder på ca. 30 cm, hvor mange du klipper opp kommer an på hvor tykt du vil at håret skal være. Jeg tror jeg brukte ca 40-50 stk. “Brett” tråden i to. Tråden skal festes på den rosa delen på hodet. Før heklekroken under masken og hent opp en tråd som skal bli hår. Lag ett kast med tråden og dra den igjennom og slipp den. Akkurat som om du lager en knute men man bruker heklekroken til hjelp.
Fest hår på hele den rosa delen. Dersom du vil ha tykkere hår kan disse festes på bakhodet. Lag en hestehale på toppen av hodet når du er ferdig.
Kropp, farge hvit (18)
Denne delen hekles i spiralrunder. Husk markeringstråd.
Det hekles fra bunnen og opp.
Rnd 1) Lag en magisk ring og hekle 6 fm i ringen. (6 fm)
Rnd 2) 2 fm i hver fm. (12 fm)
Rnd 3) *1 fm i den første fm, 2 fm i neste. * (18 fm)
Rnd 4) *1 fm i de neste 2 fm, 2 fm i neste* (24 fm)
Rnd 5) *1 fm i de neste 3 fm, 2 fm i neste* (30 fm)
Rnd 6) *1 fm i de neste 4 fm, 2 fm i neste* (36 fm
Rnd 7) *1 fm i de neste 5 fm, 2 fm i neste* (42 fm)
Rnd 8) *1 fm i de neste 6 fm, 2 fm i neste* (48 fm)
Nå skal det hekles kun i den bakerste løkken.
Rnd 9) 1 fm i den bakerste løkken i hele runden. (48 fm)
Nå skal det hekles som normalt gjennom begge løkkene.
Rnd 10) 1 fm i neste 6 fm, 2 fm sm. (42 fm)
Rnd 11-13) 1 fm i hver fm i 3 runder. (42 fm)
Rnd 14) 1 fm i de neste 5 fm, 2 fm sm. (36 fm)
Rnd 15-16) 1 fm i hver fm i 2 runder. (36 fm)
Rnd 17) 1 fm i de neste 4 fm, 2 fm sm. (30 fm)
Putt en liten pose med ris eller sand her dersom du vil at engelen skal bli litt mer stabil.
Rnd 18-23) 1 fm i hver fm i 6 runder. (30 fm)
Rnd 24 )1 fm i de neste 3 fm, 2 fm sm. (24 fm)
Rnd 25-27) 1 fm i hver fm i 3 runder. (24 fm)
Rnd 28) 1 fm i de neste 2 fm, 2 fm sm. (18 fm)
Fyll kroppen med fyllvatt.
Rnd 29-31) 1 fm i hver fm i 3 runder. (18fm)
Rnd 32) 1 fm i neste fm, 2 fm sm. (12 fm)
Rnd 33) 1 fm i hver fm i 1 runde. (12 fm)
Rnd 34) 2 fm sm, gjenta 6 ganger. ( 6fm)
Klipp tråden og sy den inn men la hullet være åpent.
Venste vinge, farge off white. (18)
Rad 1) Lag en magisk ring og lag 3 lm. (teller som en st), 5 st i ringen, 3 lm, snu. (6 fm)
Rad 2) 1 st i den første st, 2 st i hver st. 3 lm snu. (12 st)
Rad 3) 3 st i den føstre st, 1 st i hver st, 1 lm, snu. (15 st)
Rad 4) 1 fm i hver st, 3 lm, snu. (15 fm)
Rad 5) 6 st i den første fm, * hopp over neste fm, km i neste, hopp over neste, 5 st i neste* gjenta 2 ganger til. 1 fm i den siste fm. Klipp tråden og la litt garn være til overs slik at du kan feste vingen til kroppen.
Høyre vinge, farge off white (18)
Rad 1) Lag en magisk ring og lag 3 lm. (teller som en st), 5 st i ringen, 3 lm, snu. (6 fm)
Rad 2) 1 st i den første st, 2 st i hver st. 3 lm snu. (12 st)
Rad 3) 1 st i den første staven og i de neste 10 st, 3 st i den siste st, 1 lm, nu (15 st)
Rad 4) 1 fm i hver st, 1 lm, snu. (15 fm)
Rad 5) 1 fm i den først fm, km i neste, hopp over 1 fm, 5 st i neste st, * hopp over 1 fm, km i neste, hopp over neste fm, 5 st i neste* gjenta 2 ganger til. Hopp over neste fm, km i neste, 7 st i neste. 1 lm, klipp tråden og la litt garn være til overs slik at du kan feste vingen til kroppen. Sy sammen engelen.Vingene skal festes på kroppen og fest hodet på kroppen. Finn en passende posisjon. Sy inn alle løse tråder. Du kan bruke en piperenser slik at hodet blir mer stabilt.
Jeg håper at du likte oppskriften. Dersom der er noe som er uklart så ikke nøl med å ta kontakt, jeg hjelper deg gjerne! yarnhild@outlook.com
Hilsen Ragnhild


she is so pretty i am sure i will give her a try thankyou for the pattern