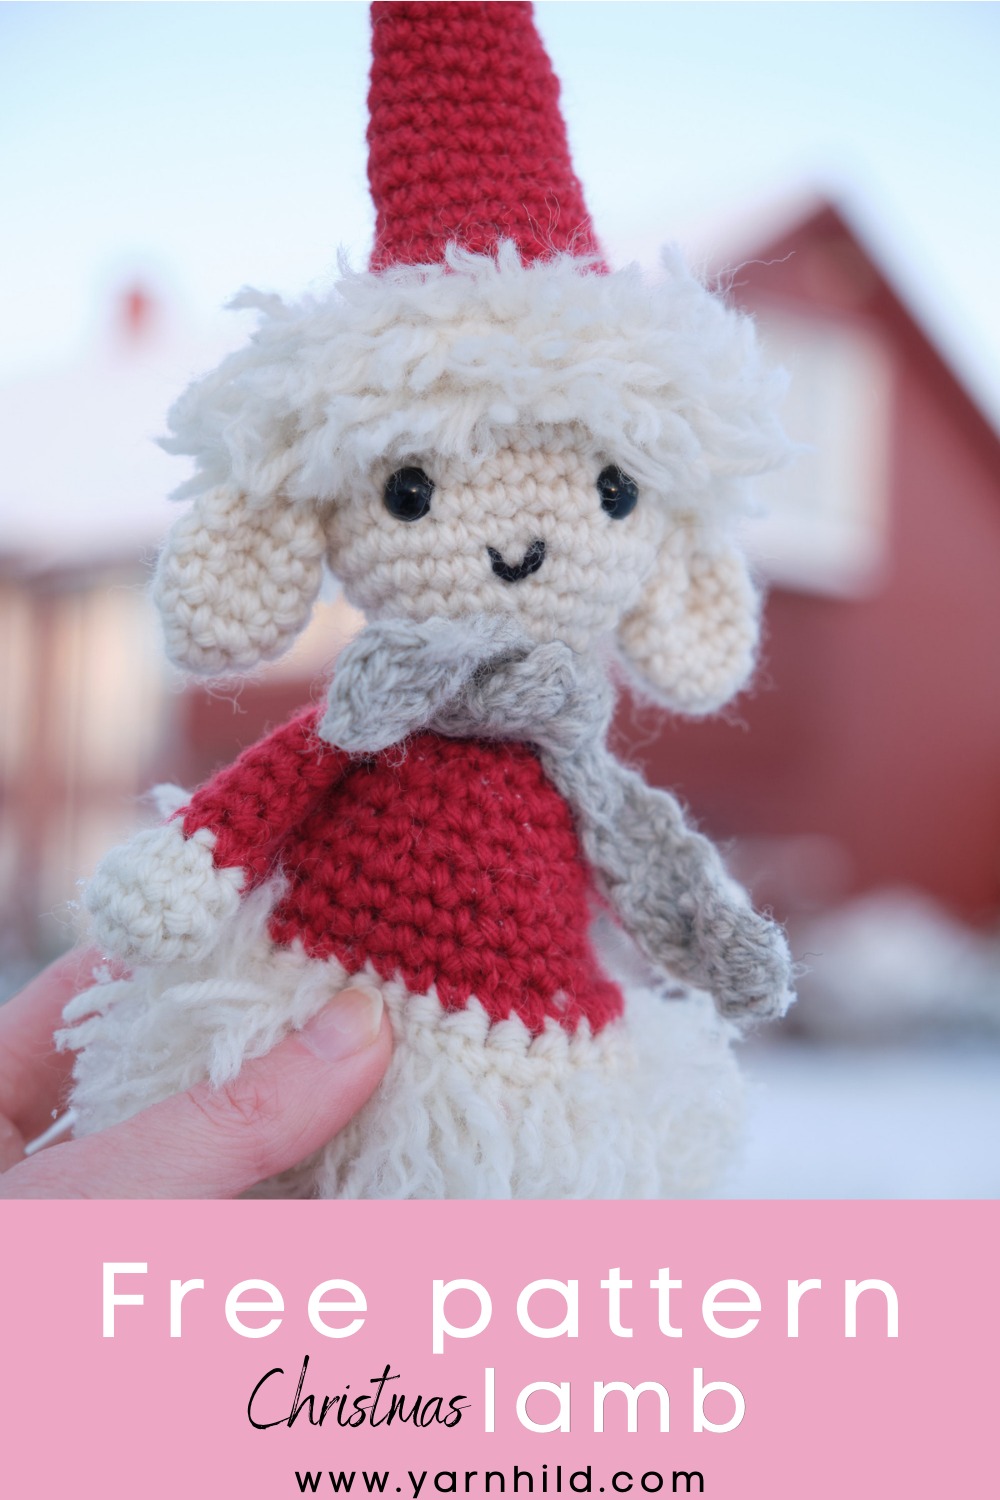
Free crochet Christmas lamb pattern
I am happy to share this adorable Christmas amigurumi lamb pattern with you! This is a free crochet pattern and all you need is some yarn, a hook, filling materials, and a tapestry needle!
You can get the FREE version below, or purchase the ad-free version in my shops.
Pin this for later on Pinterest.
I sometimes include affiliate links in my blog posts. That means that I earn a small commission if you purchase a product that I recommend, at no extra costs on your behalf. I appreciate your support!
We have gotten some snow here in Norway, so I took my amigurumi lamb outside for a photo session. I love how the pictures turned out!

About the pattern
The head and the body are made with single crochet and the loop stitches. When you are crocheting the loop stitches, you have to turn the work and crochet from the inside, so that the loops will appear on the outside.
Please don't be afraid to try the loop stitches. They are now hard to make, and there is a video that will explain how to do this .
I recommend using wool yarn and alplaca to get the same fluffy look.


Here is the video tutorial on how to do the head, also you can find the instructions below in the written pattern.
Be sure to check out my YouTube channel for more free patterns!
[ytplayer id=10154]
Other Christmas patterns
There are also other Christmas patterns on this blog, so be sure to check them out.
They go great together and they are all quick and easy to make! I have donated most of my ornaments, so I want to make a couple of trees and stocking for myself. I love creating Christmas patterns, and I think I could do that for a long time before getting tired.

Free amigurumi lamb pattern

Free crochet Christmas lamb pattern
Materials
- Abbreviations – US terms
- Ch – chain
- R – round
- St – stitch
- Sc – single crochet
- Sc dec – single crochet decrease,
- two single crochet
- together in one stitch
- Sc inc – single crochet increase,
- two single crochet in one
- stitch
- Mr – magic ring
- Sl st – slipstitch
- Lp st – loop stitch
- Lp st dec – loop stitch decrease
- Lp st inc – loop stitch increase,
- Dc – double crochet
- Materials
- - Crochet hook 3.0 mm
- - Yarn: Worsted weight 100% wool or alpaca yarn. Colors: beige and red. Amount needed: 50 g of beige yarn and 25 g of red yarn.
- - Small amount of thinner, black yarn for the mouth
- - Tapestry needle
- - 8 mm safety eyes
- - Stitch marker
- - Stuffing materials
- - Pipe cleaner or something to make the head stable
Instructions
About the pattern
The head and the body are made with single crochet and the loop stitches. When you are crocheting the work and crochet from the inside, so that the loops will appear on the outside. Below there is a link to a video on how to do the head and the loop stitches. There are time stamps in the descriptions so you can skip to the relevant parts. All the parts are worked in continuous rounds using a 3.0 mm crochet hook. Use a stitch marker and move it up as you go. The head and the hat are made in one piece. You can also only make the head and use it as a Christmas bulb. You can embroider on the eyes if you don’t have safety eyes. The rest of the parts are made separately. Make the loop stitches as long as you want, but I recommend about 2 cm before they are cut.
Level: Intermediate
Finished size: about 31 cm
Head
and hat
Beige and red. Start with beige.
R1: 6sc in a mr (6 sc)
Do not pull tight and close the hole.
R2: sc inc x 6 (12 sc)
R3:(1sc, sc inc) x 6 (18 sc)
R4:(2sc, sc inc) x 6 (24 sc)
R5: (3sc, sc inc) x 6 (30 sc)
R6-10: 1sc in each st for 5
rounds. (30 sc). Sl st in the first st and turn work.
Turn the work and crochet from the back side, so that the loop stitches
will appear on the right side. See video linked above.
Continue with the same color.
R11: 1lp st in every sc (30 lp st)
Attach safety eyes on rows 7 -8, 5 sc stitches
apart. Embroider on a little mouth with black yarn.
R12: 3lp st, lp st dec) x 6 (24 lp st)
R13: 2lp st, lp st dec) x 6 (18 lp st)
Change color to red after you finish the last
decrease stitch.
Continue in red.
R14-19: Sl st in the first st. Turn the work so
you work from the “normal” side again. 1sc in each st for 6 rounds (18 sc)
R20: sc dec, 16sc (17 sc)
R21: sc dec, 14sc (16 sc)
R22: sc dec, 13sc (15 sc)
R23: sc dec, 12sc (14 sc)
R24: sc dec, 11sc (13 sc)
R25: sc dec, 10sc (12 sc)
R26-28: 1sc in each st for 3 rounds (12 sc)
R29: sc dec, 9sc (11 sc)
R30: sc dec, 8sc (10 sc)
R31: sc dec, 7sc (9 sc)
R32: sc dec, 6sc (8 sc)
Close the hole with single crochet when it’s getting too hard to decrease.
Fasten off.
Make a little pom-pom for the hat.
Ears
Make 2
In beige.
R1: 4sc in a mr (4 sc)
R2: sc inc x 4 (8 sc)
R3: (1sc, sc inc) (12 sc)
R3-4: 1sc in each st (12 sc)
R6: (1sc, sc dec) x 4 (8 sc)
Fasten off and leave a long tail for sewing. Flatten ears and pinch base in half, sewing back and forth a few times.
Arms
Make 2
Beige and red, start with beige.
R1: 6sc in a mr (6 sc)
R2: sc inc x 6 (12 sc)
R3: 1sc in each st (12 sc)
R4: sc dec x 6 (6 sc)
Change to red.
R5-11: 1sc in each stitch for 7 rounds (6
sc)
Feet
Make 2
Beige and red, start with beige.
R1: 6sc in a mr (6 sc)
R2: sc inc x 6 (12 sc)
R3: 1sc in each st (12 sc)
R4: sc dec x 6 (6 sc)
Change to red.
R5-14: 1sc in each stitch for 10 rounds (6
sc)
Pinch the hole flat and close it with single crochet. Fasten off and
leave a long tail for sewing.
Body
In beige
R1: 6sc in a mr (6 sc)
R2: Turn work and crochet from the wrong side.
R2: lp st inc x 6 (12 sc)
R3: (1lp st, lp st inc) x 6 (18 lp st)
R4: (2lp st, lp st inc) x 6 (24 lp st)
R5: (3lp st, lp st inc) x 6 (30 lp st)
R6-7: 1 lp st in every st for 2 rounds. (30 lp st)
Change to red, turn the work so and crochet from the right side again.
R8: (3sc,
sc dec) x 6 (24 sc)
R9-10. 1 sc in every st for 2 rounds. (24 sc)
R11: (2sc,sc dec) x 6 (18 sc)
Add stuffing.
R12-13: 1 sc in every st for 2 rounds. (18 sc)
R14:
(1sc,sc dec) x 6 (12 sc)
R 15: sc dec x 6 (6 sc)
Pinch the hole flat and close it with single crochet. Fasten off and leave a long tail for sewing.
Scarf
In scarf color.
Ch 2 does not count as a stitch.
Row 1: Ch 6, turn, 1dc in the third ch from the hook and in next 3 st (4 DC)
Row 2–16: Ch 2, turn, 1 dc in every st across. (4 dc)
Fasten off, weave in ends. Make a fringe for your scarf if you want.
Assembly
Optionally
cut the loops with some scissors. Use a tapestry needle to separate the yarn strand from the loops to get a natural wooly sheep look. You can also carefully use a comb. Watch the video linked above on how to do this with the tapestry needle. Sew the head to the body. Use a pipe cleaner, or a little stick, to get more stability. Stick the pipe cleaner or the stick through the head and the neck part and sew around. Sew on the arms on near the neck. Sew on the feet under the body.
I would love to see the crochet projects you are working on! Please feel free to tag me on social media @yarnhild

Thank you for this adorable lamb!
You're welcome:)
You're welcome!